Chapter 26 - Customizing CMS Behavior with Extensions
CMS Extensions are developer-defined software modules that modify the behavior of the CMS.
In versions previous to Ektron CMS400.NET version 8.0, developers used the Plug-in Extension Wizard to extend the system. As of version 8.0, CMS Extensions are preferred over the Plug-in system.
The benefits of CMS Extensions include the following.
You have full access to the Web application context, the HTTP context, the session information, data stored in cache, and the APIs.
Extensions are easy to debug because you can attach and set breakpoints the same way you debug Web applications.
Performance is enhanced because no Web Services are required.
No Windows Services are required because CMS extensions run within the context of your Web application.
Because extensions have access to the API, more functionality is available, such as using the Notification system.
Event Handlers
An event handler is a method that executes when an event occurs within Ektron CMS400.NET. Events are a type of activity that occurs in the CMS and are exposed through the CMS Extension Framework.
Using Visual Studio to Create a New CMS Extension
The following steps explain how to create a new CMS Extension in Visual Studio.
1. In Visual Studio, choose File > New > Project...
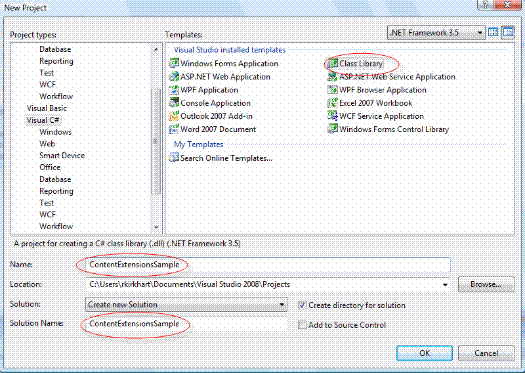
2. The New Project screen appears.

3. Under Project Type, choose either Visual Basic or Visual C#. (This example uses Visual C#.)
4. Under Templates, click Class Library.
5. Fill out the Name, Location and Solution Name text boxes.
6. Click OK.
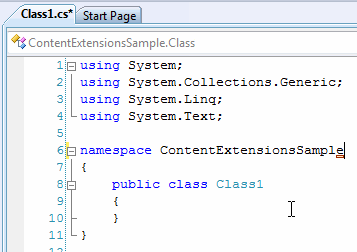
7. The Class1.cs code page appears in the editor.

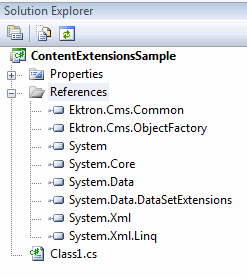
8. Add references to the following assemblies.
Ektron.CMS.Common
Ektron.CMS.ObjectFactory

You will find these in your <siteroot>/bin directory if they are not already installed in your Visual Studio.
9. Add the following using statements to the top of the class.
using Ektron.Cms;
using Ektron.Cms.Common;
using Ektron.Cms.Extensibility;
using Ektron.Cms.Extensibility.Content;
10. Update the class to extend Ektron.Cms.Extensibility.ContentStrategy.
namespace Cms.Extensions.Samples
    {
    public class ContentExtensionsSample : ContentStrategy
        {
        }
    }
Note: The namespace in the code above is Cms.Extensions.Samples. This information is needed for steps 12 below.
11. Override the method for the event you wish to catch. In this example, override OnBeforeAddContent(). The code to modify the Title looks like this.
public override void OnBeforeAddContent(ContentData contentData, CmsEventArgs eventArgs)
{
    contentData.Title += " modified";
}
12. This is what the final code looks like.
using System;
using System.Collections.Generic;
using System.Text;
using Ektron.Cms;
using Ektron.Cms.Common;
using Ektron.Cms.Extensibility;
using Ektron.Cms.Extensibility.Content;
namespace Cms.Extensions.Samples
{
public class ContentExtensionsSample : ContentStrategy
    {
    public override void OnBeforeAddContent(ContentData contentData, CmsEventArgs eventArgs)
        {
        contentData.Title += " modifed";
        }
    }
}
13. Compile this assembly.
14. Copy the resulting dll into the <webroot>\bin directory.
Register the New Extension in the ObjectFactory
After creating the extension in the steps above, register it in the <webroot>/ObjectFactory.config file.
This file already contains GoogleGeoCoder objectStrategies, so you need to add a new Name in the Content area.
In this example, the code looks like this.
<objectFactory>
    <objectStrategies>
        <add name="Content">
            <strategies>
                <add name="MyFirstExample" type="Cms.Extensions.Samples.ContentExtensionsSample, ContentExtensionsSample"/>
                <add name="GoogleGeoCoder" type="Cms.Extensions.GoogleGeoCoder.ContentStrategy, Cms.Extensions.GoogleGeoCoder"/>
            </strategies>
        </add>
        <add name="User">
            <strategies>
                <add name="GoogleGeoCoder" type="Cms.Extensions.GoogleGeoCoder.UserStrategy, Cms.Extensions.GoogleGeoCoder"/>
            </strategies>
        </add>
    </objectStrategies>
</objectFactory>
More Information about ObjectFactory objectStrategies
In order for the CMS to execute the CMS Extension properly, it must be registered in the objectStrategies section of the ObjectFactory.config file found in the Web site root.
The node <add name="Content"> tells the CMS that we are defining "Content" extensions. This is required.
In the <strategies> section, one or more extensions can be added for content.
To add a strategy, you must define two properties: Name and Type.
Name is any unique name which identifies the extension. See the list of valid names in the table below.
Type is a fully qualified name of the type you register as the extension. It contains type name (the NameSpace + type) and the assembly name of the type.
|
List of Valid Names |
||
|---|---|---|
|
Inventory Coupon BasketCalculator CouponCalculator ShippingCalculator TaxCalculator Country Region |
Basket Blog Order Customer CatalogEntry CommunityGroup Tag MessageBoard |
MicroMessage Content Folder User Forum WebEvent Taxonomy |
Test the New Extension
The new CMS extension created in the examples above modifies the title of a new content item by adding "modified" to the end of the title. To test this, create new content in the workarea. The new content title will have the word "modified" appended to the end of it.
More Examples of CMS Extensions
More examples of CMS Extensions are found in the SDK folder of the CMS. The default location for this folder is : Program Files\Ektron\CMS400SDK\CMS Extensions.
Also, samples of eCommerce extensions are found in Program Files\Ektron\CMS400SDK\Commerce\Events.
Video Tutorial about CMS Extensions
To see more code samples and a video tutorial on CMS Extensions, visit the Ektron Developer Center at this address: http://dev.ektron.com/blogs.aspx?id=29648&blogid=68.
