Facebook Login
The Facebook Login is an alternative to Ektron CMS400.NET's standard login. Its advantage is that users can log in using their Facebook username and password, instead of having to set up and remember a separate Ektron CMS400.NET username and password.
Here is an example of Facebook Login control on a Web page.
![]()
The Facebook Login control allows both Membership users and Ektron CMS400.NET users log in to an Ektron CMS400.NET Web site. If users already have an Ektron CMS400.NET user profile, they can be prompted to link the Facebook username and password with that profile.
The Facebook Login only provides an ability to log in to an Ektron CMS400.NET site. It provides no other Facebook features, such as viewing or sending messages.
This section explains how to set up and use the Facebook Login feature through these topics. Facebook
Samples of the Facebook Login Feature
Using Facebook Login with Active Directory
Developer Experience: Setup Instructions
Using Facebook Connect Extension with the Targeted Content Widget
Samples of the Facebook Login Feature
You can see samples of the Facebook Login feature in these sites.
Developer Sample site > Social Networking > Facebook Connect
- site root/developer/FacebookConnect/Login.aspx
- site root/developer/FacebookConnect/CustomSignup.aspx
Ektron Tech site has Facebook Login on the home page

Using Facebook Login with Active Directory
You cannot use the Facebook Login feature with Active Directory.
User Experience
Note: The user experience is only enabled after a developer sets up the feature. See Also: Developer Experience: Setup Instructions
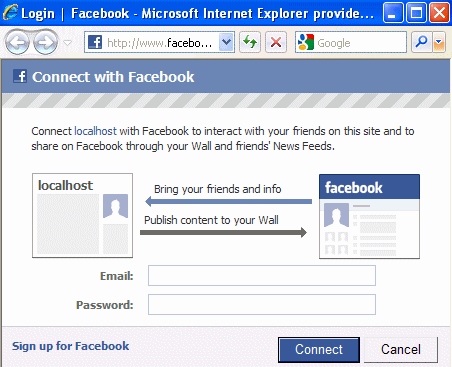
If a user clicks a Facebook Login button but is not logged into Facebook, the page below appears

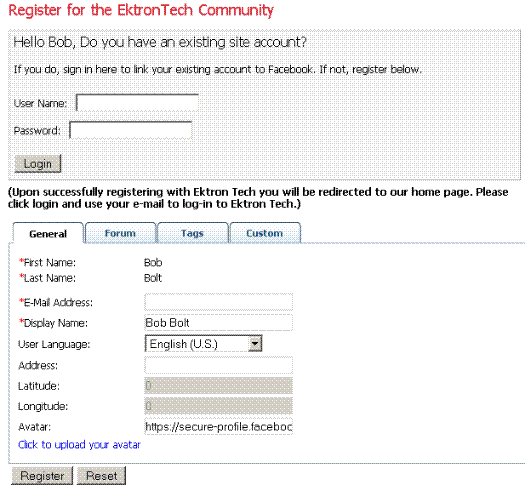
When the user completes this screen or if the user is already logged into Facebook, he is forwarded to a page (see example below) that prompts him to register or log in to Ektron CMS400.NET.

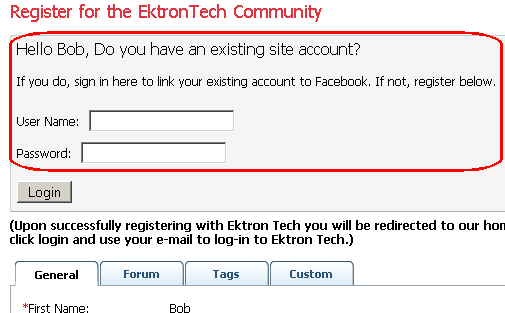
This screen asks the user if he has a membership account and, if so, would he like to connect his Facebook username and password with the Ektron CMS400.NET account. If the user agrees, he will access his membership account via the Facebook Login control with Facebook credentials from now on.
If the user does not have a membership account, he completes the lower half of the screen. This is the same screen that new members use to create accounts. See Also: Membership Server Control
From then on, the user can click the Facebook Login button to log into Ektron CMS400.NET using his Facebook username and password.
When the user logs out of Ektron CMS400.NET, that action does not log him out if Facebook. Conversely, if a user logs out of Facebook, he is not logged out of Ektron CMS400.NET.
Note: Facebook often caches some information in your browser. If you see JavaScript errors or other odd behavior, clear the browser cache, close all browser windows, and try again.
Developer Experience: Setup Instructions
To set up the Facebook Login feature, follow these steps.
Step 1: Connect Facebook to Your Ektron CMS400.NET Web Site
Step 2: Create or Modify a Facebook Login/Signup Page
Alternative to Redirecting to the Signup Form
Step 1: Connect Facebook to Your Ektron CMS400.NET Web Site
Follow these steps to obtain Facebook keys, paste them into the web.config file, and identify your site to Facebook.
1. In you don't have one, create a Facebook account. Go to www.facebook.com and follow the sign up instructions.
2. Sign in to the Facebook Developer site, http://www.facebook.com/developer.
3. Click +Set up New Application.
4. Enter a name for your application. The name cannot include facebook or any variations, such as FB.
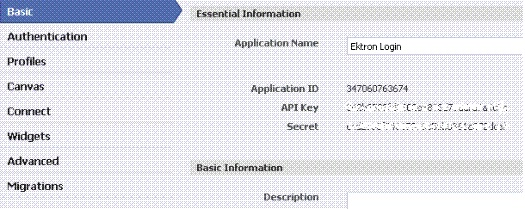
5. A new screen appears, showing your Application ID, API key, and Secret key.

6. Open your Web site's root folder/web.config file.
7. Copy the corresponding Facebook keys into these web.config elements
ek_FacebookApiKey
ek_FacebookSecret
Note: Keys shipped in Ektron sample sites are for localhost.
Note: Make sure the Facebook keys were generated for the host header/URL to which you're applying them. Also, if you are testing using secure site setup, verify that the web.config element ek_useSSL is true.
8. Save and close web.config.
9. Return to the Facebook Basic screen.
10. Click the Connect tab from the left panel.
11. Into the Connect URL field, enter the URL of your Web site.

for a public site, enter its URL. For example, www.ektron.com.
for a shared server or if you are accessing the site from a remote machine, use the IP address. As examples, http://192.168.14.10, http:// 192.168.14.10/QA
for a local server, use localhost. As examples, http://localhost, http://localhost/EktronTech
12. Save and close the Facebook screen.
After setting up your application, you can return to this screen at any time to view the keys, edit the Connect URL setting, etc.
Step 2: Create or Modify a Facebook Login/Signup Page
Facebook provides a sample form (shown below) that appears if a user clicks a Facebook Login button and is not currently logged into Facebook.

The above form is created by Facebook, not Ektron CMS400.NET. You can customize parts of it, such as the title and site image) using Facebook's Application settings.
When the user completes the form, he is forwarded to an Ektron CMS400.NET form (see example below) that prompts him to register or login to Ektron CMS400.NET.

You specify which form appears via the Facebook Login server control's SignupTemplate property. The default form in the Developer sample site, site root/Developer/FacebookConnect/register.aspx, is shown above. You can use the default form as is, modify it, or create your own.
The logic to connect a Facebook user with an Ektron CMS400.NET account (circled below) is not part of the Facebook Login server control. However, sample code for that functionality is included in the Ektron Tech sample site's register.aspx page.

Alternative to Redirecting to the Signup Form
If you do not want to redirect the user to a signup form after the Facebook login, you can instead hook the Ektron_FacebookNewMemberLoggedIn javascript event and do whatever you want with it. For example, you could raise a modal dialog with a short signup form.
You can see an example of hooking this javascript event in the Developer site under Social Networking > Facebook Connect > Custom signup (site root/developer/facebookconnect/customsignup.aspx).
Step 3: Place the Facebook Login Server Control on a Page
1. In Visual Studio, open the template onto which you want to place a Facebook Login server control. See Also: Working with Ektron CMS400.NET Server Controls
2. Drag and drop the control.
3. Use the following table to complete its properties.
Note: The following table only lists Ektron-specific properties. It does not describe native .NET properties such as font, height, width and border style. For documentation of these properties, see Visual Studio help.
|
Property |
Description |
Data Type |
| Authenticated |
Indicates if you are logged in to the CMS Explorer and can use it to browse to Content, Collections, etc. See Also: ”Using CMS Explorer to Browse Your Ektron CMS400.NET Site” on page 21-12 |
String |
| FacebookButtonText | Enter the text that appears on the Facebook Login button. The default text is Connect with Facebook. |
String |
|
Hide |
Used to hide output of the control in design time and run time. True = Hide control False = Display control |
Boolean |
| InstructionDetail |
Enter additional text that appears above the Facebook Login button. The default text is Sign in using your Facebook account. |
String |
| InstructionHeader | Enter the text that appears above the Facebook Login button. The default text is Sign in using your Facebook account. |
String |
|
Language |
Set a language for viewing the Facebook Login control. This property shows results in design-time (in Visual Studio) and at run-time (in a browser). |
Integer |
| SignupTemplate | Enter the path to the template that appears after a user completes the Connect with Facebook screen. Step 2: Create or Modify a Facebook Login/Signup Page |
String |
You can customize the markup for the form using the LoginTemplate and LogoutTemplate server controls. You can find examples of this on the developer site at siteroot/developer/facebookconnect/login.aspx
Note: After you update web.config with the Facebook keys, wait a few minutes before logging into Ektron site via the Facebook Login server control.
Using Facebook Connect Extension with the Targeted Content Widget
By using Facebook Login, you can retrieve profile information from the user's facebook account using Facebook Connect Extension.
This is information available in Facebook profiles.
- Age
- Gender
- Marital Status
- Likes
- Employment
For more information about code to do this, see the Knowledge Base article entitled "INFO:Targeted Content Widget: Facebook Connect Extension" located at http://dev.ektron.com/kb_article.aspx?id=32156.
To learn more about the Targeted Content Widget, see Creating a Targeted Content Widget.
