Blog Comments
Important: Do not confuse blog comments with history comments. You can add a history comment to the blog post by clicking the Comment tab. This is not the same as adding a comment to a blog post on a site. When you add a history comment, it has the same properties as a comment associated with content.
Blog comments allow site visitors to add their thoughts about a blog post. The blog administrator controls commenting by deciding
who can add comments
if they require approval for publication
Controlling Blog Comments
Ektron CMS400.NET provides three properties for controlling comments. Use the Blog Properties screen to set them. See Also: Blog Properties. The following table describes the properties.
|
Field |
Description |
|
Allows user in Workarea and site visitor to add blog Note: A member of the Administrators group can always add comments, regardless of how this checkbox is set. |
|
|
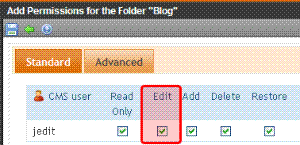
Determines if comments must be approved before they appear on site. If this field is checked, only Ektron CMS400.NETusers with permission to edit the post can approve comments (see illustration of this permission below). Note: Membership users cannot approve blog comments.
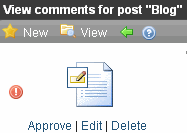
If a user without edit permission adds comments, they only appear on the Web site after being approved by someone with edit permission. See Also: Approving a Comment If a user with edit permission logs in, his comments are approved automatically. Appearance of Unapproved Comments On the Workarea’s View Posts in Blog screen, an unapproved comment is indicated by a red exclamation point. You can click this icon to go directly to the View Comments for Post screen. On the View Comments for Post screen, an unapproved comment is indicated by a red exclamation point.
|
|
|
Require Authentication |
Determines if a user must be authenticated (that is, logged in as an Ektron CMS400.NET user or membership user) to add comments via the Web site. |
By default, comments are fully controlled. This means they are enabled, must be approved, and a site visitor must log in to create them.
If comments are enabled but not moderated, any site visitor can add a comment. If you don’t want censorship, this is the way to go.
However, to make sure comments on your site meet certain criteria, moderate them.
Important: If comments are not moderated, they appear on your site as soon as a site visitor submits them.
Comments on the Site
On the site, blog post comments appear when one of the following blog post items is clicked:
the Comments link
the Title of the blog post
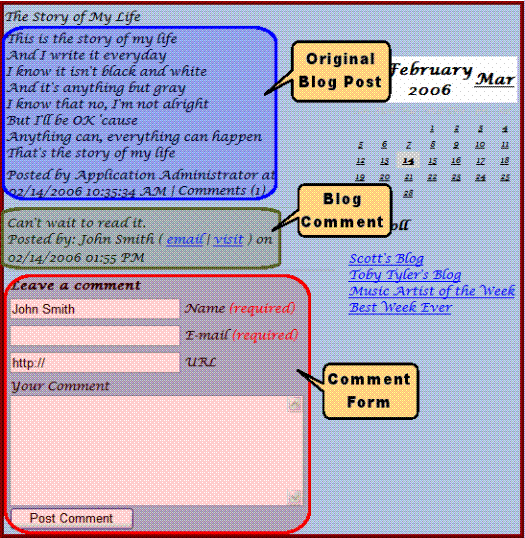
The comment page contains the original post, any comments that have been added, and a form to post new comments. Depending on how the page is designed, the calendar and blog roll can also appear.

Comments in the Workarea
The Workarea's View Posts in Blog screen lets you add, view, approve, edit, and delete comments for a blog post. See Also: Blog Comments
The Comments column (circled below) indicates the number of comments. If a post has unapproved comments, a red exclamation point appears next to it.

To work with comments, click the number in the Comments column next to a blog post. This redirects to the View Comments screen, where you can view approve, edit, delete, and add new comments.
Note: To learn about recognizing unapproved comments and approving them, see Controlling Blog Comments.
See Also:
Adding a Comment
Note: To be able to add a comment, you must have Add permission on the blog’s Standard Permissions screen.
To add a blog post comment from the Workarea, follow these steps.
1. From the Content area, navigate to the blog.
2. Find the post that you want to edit.
3. Click the number in the Comments column.
4. The View Comments for Post screen appears.
5. Choose New > Comment.
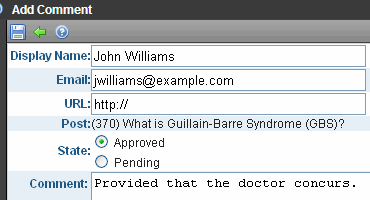
6. The Add Comment screen appears.

Note that Add Comment screen provides an additional field, State. This field lets the submitting user set the comment’s state to approved or pending. Approved comments appear on the site immediately. Pending comments must be approved before they appear.
To learn about the approval process for pending comments, see Moderate Comments. See Also: Blog Comments; Permissions and Approvals
Editing a Comment
1. From the Content area, navigate to the blog.
2. Find the post that you want to edit.
3. Click the number in the Comments column.
4. The View Comments for Post screen appears.
5. Locate the comment you want to edit.
6. Click edit.
7. The Edit Comment screen appears.
For a description of the fields on this screen, see Blog Comments.
Note that Edit Comment screen provides an additional field, State. This field lets the submitting user set the comment’s state to approved or pending. Approved comments appear on the site immediately. Pending comments must be approved before they appear.
To learn about the approval process for pending comments, see Moderate Comments.
See Also: Blog Comments; Permissions and Approvals
Deleting a Comment
Once a comment is deleted, you cannot retrieve it.
1. From the Content area, navigate to the blog.
2. Find the post that you want to edit.
3. Click the number in the Comments column.
4. The View Comments for Post screen appears.
5. Click delete.
6. A dialog box asks you to confirm.
7. Click OK to delete the comment.
Approving a Comment
Comments can require approval if
they are submitted from the Web site and Moderate Comments is checked in the blog’s folder properties
a user submits the comment from the Workarea and sets its state to Pending
Only users with permission to edit content (posts) within the blog folder can approve comments. To learn about the approval process for pending comments, see Moderate Comments.
To approve a comment, follow these steps.
1. From the Content area, navigate to the blog.
2. Find the post that has a comment that requires approval.
3. Click the number in the Comments column.
4. The View Comments for Post screen appears.
5. Click approve.
6. The comment’s status changes to approved.
See Also: Blog Comments;


