Using email to Communicate Community Activities
This section explains how to manage notification messages sent via the email agent. As explained in Notifications, Ektron CMS400.NET notifies community users about other user's activities by these agents.
- SMS
- Activity Stream
Generating email When Community Activities Occur
Ektron CMS400.NET's Community Feature can generate email when a user completes an activity. For example, if a member posts a comment to a community message board, group members who signed up for email notification in their user profile receive an email that contains the comment. Recipients can reply to the email. Replies are posted on the community group's message board.
You can also enable the attachment of files to email notifications. So, if a group manager uploads a PDF file to a group message board, the email notification message contains the PDF file as an attachment. Users can reply to that message and, if they attach an updated version of the file, it can replace the file on the group's message board.
Finally, you can set up an email address for a group. This makes it easy for anyone to broadcast a message to all group members.
This section also contains the following topics.
- Step One: Enter Sending Email Address Information
- Step Two: Review the Community Activity Notification Message
- Step Three: Set Up email Preferences
- Step Four: Set up the email Reply Feature
- Step Five: Enable Attachments to Notifications
- Define a Community Group's email Address
Setting Up email Delivery of Notification Messages
Prerequisites: Notifications must be enabled. See Conditions for Notification Messages.
To set up email delivery of and replies to notification messages, follow these steps.
Step One: Enter Sending Email Address Information
Important: You must have permission to edit files on the Ektron CMS400.NETserver to complete this step.
The site root/web.config file collects the outgoing email address information. To define the "From:" address of community email sent from your Web site, follow these steps.
1. On the server that hosts your Web site, open the site root/web.config file with a text editor (such as Notepad).
2. Find the section below the <notificationAgent> <providers> elements.
3. Define the elements in the following table. Do not change other elements in that section.
| Field | Description |
|---|---|
| smtpServer | Enter the name of the server that hosts your Ektron CMS400.NET Web site. |
| smtpPort | Enter the port that sends outgoing email from the site. |
| username |
Optionally, enter the username to authenticate against the smtp server. |
| password |
Optionally Enter the password to authenticate against the smtp server. |
| from Email | Enter the “from” email address of all outgoing community email. When a recipient gets an email, this value appears in the From: field. |
Step Two: Review the Community Activity Notification Message
Ektron CMS400.NET provides a message that is emailed when each community activity is completed. To view the message in the Ektron CMS400.NET Workarea, choose Settings > Community Management > Notifications > Messages and click Email Message Reply.
You can modify the message as described in Notification Messages.
Step Three: Set Up email Preferences
Ektron CMS400.NET provides a default set of Notifications that apply to all newly-created users. After a user is created, he can change his preferences by editing his profile, selecting the Activities tab, and checking or unchecking activities and agents. See Also: Setting a User’s Notification Activities
Similarly, a community group member can access any community group profile and click Edit Group Notification Preferences to set the group's preferences.
For a list of activities, see Activities that Trigger a Notification Message. To learn about agents that appear across the top of the screen (for example, SMS), see Notification Agents.
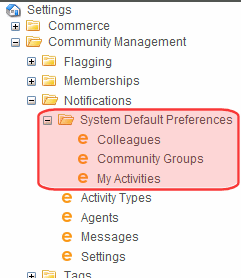
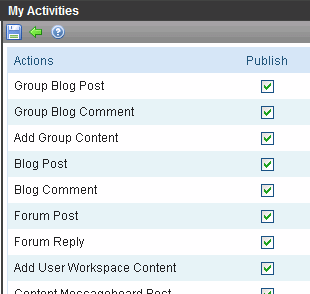
You can apply three types of default settings via screens on the Workarea Settings tab (illustrated below).
Notification of colleagues’ activities
Notification of community group activities
Notification of your activities to other users or community groups
Note: If you are upgrading to Version 8.0, all activities are checked for the Activity Stream agent by default. No activities are checked for the other agents by default.
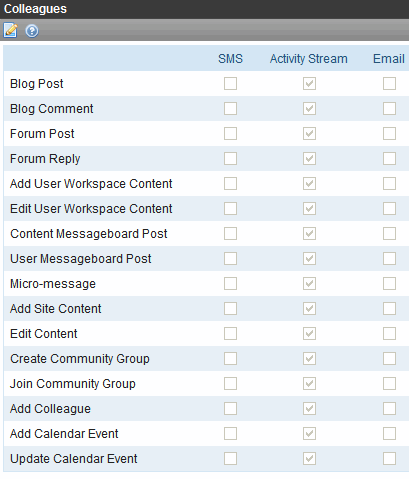
Step 3A: Setting Default Colleague Notifications
To set default Notifications for colleagues, follow these steps. See Also: Using email to Communicate Community Activities
1. Log in to the Ektron CMS400.NET Workarea as an administrator.
2. Navigate to Settings > Community Management > Notifications > System Default Preferences > Colleagues.
3. Click Edit ( ).
).
4. Place a check mark next to each a default Notification.
5. Click Save ( ).
).
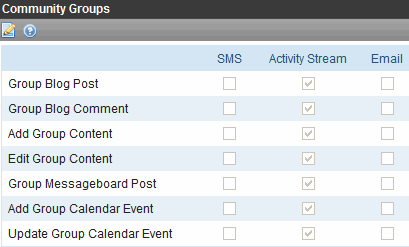
Step 3B: Setting Default Community Group Notifications
To set the default Notifications of community group activities, follow these steps. See Also: Using email to Communicate Community Activities
Community group members can modify their group's preferences. To do this, they access any community group's profile, then click Edit Group Notification Preferences.
1. Log into the Workarea as an administrator.
2. Navigate to Settings > Community Management > Notifications > System Default Preferences > Community Groups.
3. Click Edit ( ).
).
4. Place a check mark in each box you want to be a default Notification.
5. Click Save ( ).
).
Step 3C: Setting Default Notifications For Your Activities
To set the default Notifications of the logged-in user’s activities that will be sent to other users and groups, follow these steps. See Also: Using email to Communicate Community Activities
1. Log into the Workarea as an administrator.
2. Navigate to Settings > Community Management > Notifications > System Default Preferences > My Activities.
3. Click Edit ( ).
).
4. Place a check mark in each box you want to be a default Notification.
5. Click Save ( ).
).
Step Four: Set up the email Reply Feature
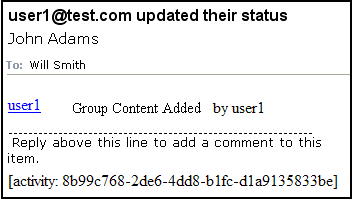
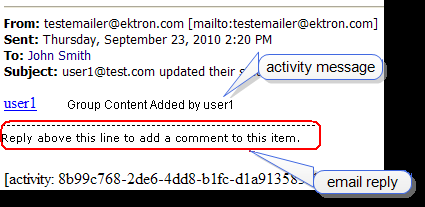
The optional email Reply feature consists of additional text in a community notification that prompts a recipient to reply, as shown in the following example.
If the recipient replies, the resulting email is posted to the group's message board.
Important: The Community email Reply feature is only available with group activities, such as uploading a document to a group workspace. It is not available with user activities.
Prerequisite: The community notification feature must be enabled. See Setting Up email Delivery of Notification Messages
To set up the Community email Reply feature, follow these steps.
Step 4A: Enter the Receiving email Address Information
Step 4B: Review the email Reply Message
See Also: How email Replies are Handled
Step 4A: Enter the Receiving email Address Information
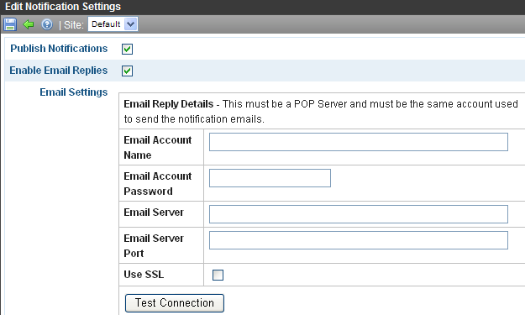
Specify the email address to receive email replies in the Community Notification Settings screen.
Prerequisite: You are a member of the Administrators group or the community group administrator
To enter receiving email address information, follow these steps.
1. From the Ektron CMS400.NET Workarea, choose Settings > Community Group > Notifications > Settings.
2. Use the following table to complete the screen.
| Field | Description |
|---|---|
| Enable Email Replies | Check this box to access the fields in the lower part of the screen. |
| Email Account Name |
Enter the address that receives email delivered to your Web site. The email account must be the same as the account used to send email. See Also: Step One: Enter Sending Email Address Information Important: Each community group's email address must be unique. |
| Email Account Password | Enter the password for that email address. |
| Email Server | Enter the POP mail server that retrieves email for this account. |
| Email Server Port | Enter the port number used to retrieve email for this account. |
| Use SSL | Check this box if you use SSL when retrieving email. |
| Test Connection |
After you complete the above fields, click this button to verify the information and your ability to connect to the mail server. |
Note: If you are using Gmail as the SMTP server to fetch email replies, after the notification service processes the emails, you probably want to delete them from the Inbox. To set up automatic deletion of this email from the Inbox, got to Gmail's Settings screen > Forwarding and POP/IMAP tab > Pop Download Area > 2. When messages are accessed with POP > select delete Gmail's copy.
Step 4B: Review the email Reply Message
Community activity that generates an email also can include a reply statement, as shown in the following example.
Note: The activity message text is determined by the activity. For example, if the activity is a blog post, the message text is retrieved from the New Blog Post notification message.
To review and modify email reply text, follow these steps.
Prerequisite: You are a member of the Administrators group or the community group administrator
1. In the Workarea, choose Settings > Community Management > Notifications > Messages.
2. Click Email Message Reply.
3. You cannot edit the Title, Type, Sub Type or Default check box.
4. The Subject field is not used.
5. Edit the message text. You can create an HTML-based and a plain text message for each activity. Typically, HTML messages are sent as email or to the ActivityStream server control, while plain text is used in SMS style messages.
The line of dashes separates the activity message from the email reply.
Messages typically combine text and tokens, Ektron-defined variables surrounded by at signs (@). When a message is generated, tokens retrieve information about Ektron CMS400.NET users, groups, and objects. See Also: Working with Tokens
Changing the Message's Start and End Delimiters
By default, the email message reply begins with a new line character and ends with the line of dashes you see in the message text. If desired, you can change those defaults. For example, you want to limit the reply to a single paragraph.
To change the start and end delimiters for the email reply, follow these steps.
1. On the server that hosts Ektron CMS400.NET, open C:\program files\ektron\ektronnotificationservice\
ektron.notification.service.exe.config.
2. Find the <siteNotification> <sites> element.
3. Insert the following properties at the end of the <Add> tag.
replyStartDelimitter - marks the beginning of the reply
replyEndDelimitter - marks the end of the reply
For example:
<siteNotification>
   <sites>
        <add name="dev" url="http://localhost/eintranet" connectionString="server=.;database=eintranet;
Integrated Security=TRUE;user=;pwd=;" services="All"
replyExtractor="Ektron.Notification.Service.EktronReplyExtractor"
replyStartDelimitter="^" replyEndDelimitter="\r\n" />
    </sites>
 </siteNotification>
You use RegEx expressions to indicate the start and end delimiters. In the above example, the start delimiter (^) is a new line, and the end delimiter (\r\n) is a page break. So, only the first paragraph in the email reply is used.
How email Replies are Handled
Activity notifications can prompt recipients to reply. The following table shows how each activity treats email replies.
Note: If you are in a load-balanced environment, the same reply may appear several times. If this problem occurs, stop the Ektron notification service on all but one of the servers in the cluster.
|
Activity that Triggers Message |
How email Reply Handled |
|---|---|
|
User adds a colleague |
Comment on Activity Stream |
|
User adds content to Ektron CMS400.NET |
Post to Content Message Board |
| Event is added or changed on Web Calendar |
Comment on Activity Stream |
|
User uploads content to community group Workspace |
Post to Content Message Board |
| User comments on group workspace content or asset | Comment on Activity Stream |
|
User uploads content to his profile |
Post to Content Message Board |
| Comment on user workspace content or asset | Comment on Activity Stream |
|
User comments on a blog post |
Comment to same blog post |
|
User posts to his blog |
Comment on post |
|
User posts to a message board associated with content |
Reply to post |
|
User creates a community group |
Comment on Activity Stream |
|
User posts to a Forum |
Reply to post |
|
User replies to a Forum post |
Reply to post |
|
User comments on a community group’s blog post |
Comment on same blog post |
|
User posts to community group blog |
Comment on post |
|
User posts to a community group message board |
Reply to post |
|
User joins community group |
Comment on Activity Stream |
| User posts micro-message |
Comment on Activity Stream |
|
User updates his status |
Comment on Activity Stream |
|
User posts to another user's message board |
Reply to post |
| Message board reply | Reply to same post |
Step Five: Enable Attachments to Notifications
Ektron CMS400.NET can attach assets to a notification. For example, a user uploads a PDF document to a group workspace, which generates a Group Content Added notification and attaches the asset.
If you enable attachments and the email Reply feature, message recipients can
- Download the attached asset to their computer
- Modify it
- Reply to the email
- Attach the modified asset
If they do, Ektron CMS400.NET replaces the community group asset with the attached file.
If a group administrator does not want the revision, he can use the asset history to restore the original asset. See Also: Viewing and Restoring Previous Content
Important: If a message's email signature includes an image, the email Reply feature uploads it as a group asset. To avoid this, remove the image from the signature before replying.
To set up notification attachments for a community group, follow these steps.
1. From the community group page, click Edit Group.
Alternatively, in the Ektron CMS400.NET Workarea, choose Settings > Community Management > Community Groups > click a community group.
2. Near the bottom of the screen, check the Attach Documents in Email Notifications box.
3. Click Save ( ).
).
Define a Community Group's email Address
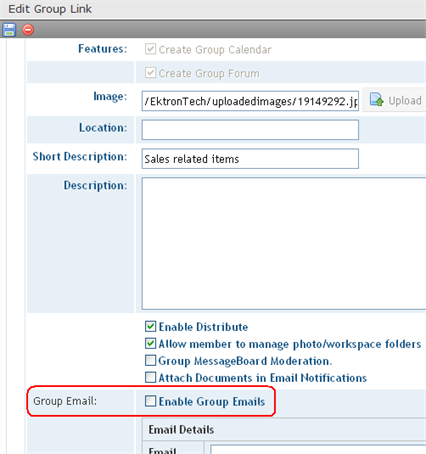
You can set up Ektron CMS400.NET's Community Feature to let anyone email a post to a community message board. To set up this capability, each community group administrator (or Ektron CMS400.NET administrator) must define information about the receiving email account, as shown in the following steps.
1. On community site's group page, go to Edit Group > Properties tab > Enable Group emails checkbox.
Alternatively, from the Workarea, choose Settings > Community Management > Community Groups. Click the group, then click its Properties tab and check the Enable Group emails checkbox.
2. Enter the group's email address, account name and password.
 Show me