Friends Server Control
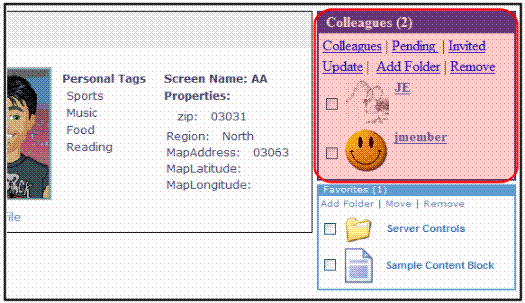
Part of the Community Platform, the Friends server control typically appears on your profile page and displays your colleagues. If you browse to another user's profile, you see that user's colleagues.
The control can display a list of
- current colleagues—users who accepted your invitation to be a colleague, or whose invitation to be a colleague you accepted
- pending colleagues—users who sent you a colleague request, which you have not yet accepted
- invited colleagues—users to whom you have sent colleague requests, which have not yet been accepted
The control can allow a user to navigate between views.
The Friends server control also lets a user designate a Selected Colleague, a special category whose members can view documents and photos that regular colleagues and the public cannot view.
Setting the Friends Server Control’s Display Mode
The Friends server control's DisplayMode property controls whether a user’s colleagues are displayed as a
basic list
grouped by folder
colleagues who asked you to become their colleague
people you invited to be your colleague
For more information, see DisplayMode.
Managing Colleagues
To manage existing colleagues on the Web site, find the Colleague area of your profile page. From here, you can view, approve, and remove colleagues.
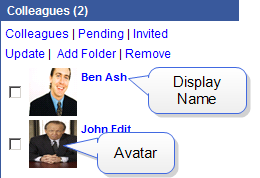
The following sections explain how to manage colleagues.
Designating a Selected Colleague
Viewing Colleague Requests
Pending colleagues are users who sent you a colleague request which you have not yet accepted. To view pending colleagues on the Web site, navigate to the Pending Colleagues area of your profile page. From this area, you can accept or decline colleague requests.
Accepting a Colleague Request
Accepting a colleague request adds the user to your colleagues list. This allows you to access additional information on the colleague's profile page. To accept a pending colleague request, follow these steps.
1. Navigate to the Pending colleagues area of your profile page.
2. Place a check in the box next to each colleague whose request you want to accept.
3. Click Approve.
The page refreshes, and the selected users are removed from the Pending Colleagues list and added to the colleagues list.Friends Server Control
Declining a Colleague Request
Declining a colleague request cancels the request. Once you decline the request, it is removed from your Pending Colleagues list and the requester’s Invited list. To decline a colleague request, follow these steps.
1. Navigate to the Pending Colleagues area of your profile page.
2. Place a check in the box next to each colleague whose request you want to decline.
3. Click Remove Selected.
4. A dialog box asks you to confirm that you are declining the colleague.
5. Click OK.
6. The page refreshes, and the selected users are removed from your Pending Colleagues list and requester’s Invited list.
Viewing Invited Colleagues
The Invited colleagues list displays users to whom you’ve sent colleague invites. From this screen, you can delete requests that have not yet been accepted. See Also: Canceling Invited Colleagues
To view sent colleague requests, navigate to the Invited Colleagues area of your profile page.
Canceling Invited Colleagues
To cancel a colleague request, follow these steps.
1. Navigate to the Invited Colleagues area of your profile page.
2. Place a check in the box next to each colleague whose invite you want to cancel.
3. Click Remove Selected.
4. A dialog box asks you to confirm that you are canceling the colleague invites.
5. Click OK.
6. The page refreshes, and the invited colleague is removed from the Invited Colleagues list and the colleague’s Pending list.
Removing Colleagues
If you would like to end your association with a colleague, remove him by following these steps.
1. Navigate to the Colleagues area of your profile page.
2. Place a check in the box next to each colleague you want to remove.
3. Click Remove Selected.
4. A dialog box asks you to confirm the removal.
5. Click OK.
Designating a Selected Colleague
Selected colleague is a special category of user who can be given access to documents and photos that regular colleagues cannot view. A user makes this designation when sharing a Workspace. The user can share with the Public, all colleagues, or selected colleagues. See Also: Sharing Workspace Content
Follow these steps to mark a colleague as a Selected Colleague.
1. Navigate to the Colleagues area of your profile page.
2. Place a check in the box next to each colleague you want to make a Selected Colleague.
3. Click Update.
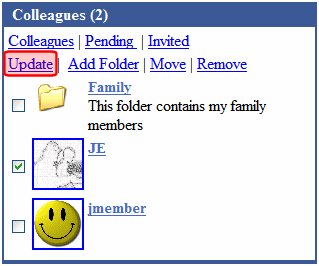
4. A dialog box asks you to confirm the status change of the colleague.
5. Click OK.
6. Selected Colleague appears next to the colleague.
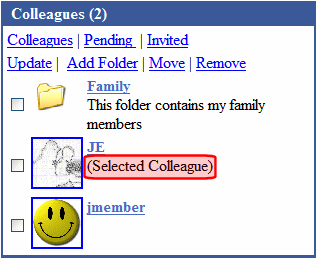
You can later change a selected colleague back to a colleague. To do so, place a check in the box next to a selected colleague and click Update.
Grouping Colleagues by Folder
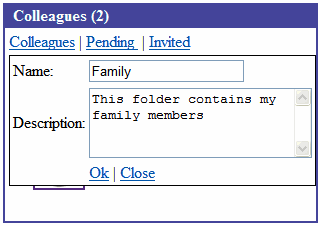
Grouping lets you organize colleagues by folder. For example, you place all family members in a "Family" folder.
You can only group current colleagues, not colleagues who are pending or invited.
The following sections explain how to work with Colleague folders.
- Creating a Folder
- Placing a Colleague in a Folder
- Changing a Folder’s Name or Description
- Deleting a Folder
Creating a Folder
1. Make sure the DisplayMode property of the Friends server control is set to Directory.
2. Log in to the Web site.
3. Navigate to your profile page or a page the contains a Friends server control.
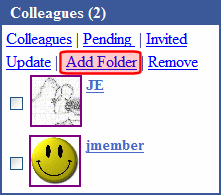
4. Click Add Folder in the Friends server control.
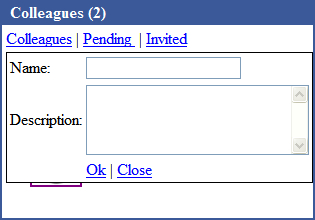
5. Enter a Name and Description for the folder.
6. Click OK.
Placing a Colleague in a Folder
To move a colleague to a folder, follow these steps.
Prerequisite: At least one colleague folder. See Creating a Folder
1. Navigate to your profile page or a page the contains a Friends server control.
2. Check one or more colleagues.
3. Click Move on the Friends server control.
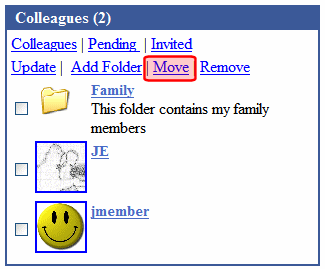
4. A list of folders appears. Select the folder to which you want to move them.
5. Click OK.
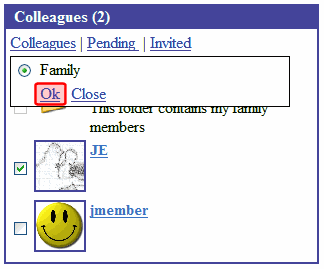
6. A dialog box asks you to confirm. Click OK.
You can now find the colleague in the folder. Click it to see all colleagues in the folder.
Changing a Folder’s Name or Description
To change a folder's name or description, follow these steps.
1. Navigate to your profile page or a page the contains a Friends server control.
2. In the Colleagues section of the screen, click Edit Folder (
3. A dialog box appears.
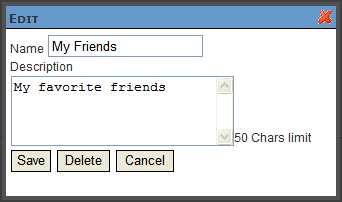
4. Change the name, description or both.
5. Click Save.
Deleting a Folder
Warning! Deleting a folder also deletes all colleagues in the folder. If you want to retain the colleagues, move them out of the folder before deleting it. To remove a colleague from a folder, click the folder, check the colleague, and click Move Up One Level.
Warning! Deleting a folder also deletes all of its subfolders.
To delete a folder, follow these steps.
1. Navigate to your profile page or a page the contains a Friends server control.
2. In the Colleagues section of the screen, click Edit Folder (
3. A dialog box appears.

4. Click Delete.
5. You are asked if you are sure you want to delete the folder. Press OK.
6. Click Save.
Friends Server Control Properties
The Friends server control properties are described in this table.
Note: The following table only lists Ektron-specific properties. It does not describe native .NET properties such as font, height, width and border style. For documentation of these properties, see Visual Studio help.
|
Property |
Description |
Data Type |
|
Authenticated |
Indicates if you are logged in to the CMS Explorer and can use it to browse to Content, Collections, etc. See Also: |
String |
|
AvatarHeight |
The display height in pixels of the avatar in the results box. 0 (zero) = unlimited. |
Integer |
|
AvatarWidth |
The display width in pixels of the avatar in the results box. 0 (zero) = unlimited. |
Integer |
|
CacheInterval |
Sets the amount of time, in seconds, that the server control’s data is cached. The default is 0 (zero). For example, to cache the data for five minutes, set to 300. See Also: Caching with Server Controls |
Double |
|
DefaultUserID |
The default user ID for this control if no matching dynamic parameter value is passed. |
Long |
|
Select the way this control displays colleagues. Choices are: Directory—allows users to group colleagues by folders. In this mode, these menu items appear. Add Folder—lets user add a folder. Move—lets a user place colleagues in a folder. This option appears only if a folder exists. List—lists colleagues in alphabetical order Pending— lists pending colleagues, users who have sent colleague requests to the logged -in user. The user can approve or decline these requests. Managing Colleagues SentInvites—lists users to whom the logged -in user sent colleague requests. The user can cancel invitations that have not been accepted yet. See Also: Managing Colleagues |
eDisplayMode |
|
|
DisplayXslt |
Determines how information is displayed on the page. Enter the path to the XSL file. It can be relative or absolute. Warning! If you specify an external file, it is strongly recommended that you do not store this file in your site's Workarea folder. If you do, the file will be overwritten when you upgrade. Warning! If you enter a valid EkML file at the MarkupLanguage property, the DisplayXslt property value is ignored. |
String |
|
DoInitFill |
By default, Fill occurs during the Page_Init event. Set to false if you want to postpone the fill-action until later. In this case, FIll is automatically called during the Page Render event. You might do this if you need to set or change a property on the control in codebehind and have it render with your changes shown. |
Boolean |
|
DynamicParameter |
Gets or sets the QueryString parameter to read a user ID dynamically. To use the default user ID, leave blank. |
String |
|
FriendLabel |
Set the singular text to be used as a title for the Friends server control. The default value is Colleague. |
String |
|
FriendsLabel |
Set the plural text to be used as a title for the Friends server control. The default value is Colleagues. |
String |
|
Hide |
Used to hide output of the control in design time and run time. True = Hide control False = Display control |
Boolean |
|
Language |
Set a language for viewing the Friends control. This property shows results in design-time (in Visual Studio) and at run-time (in a browser). |
Integer |
|
Link |
Enter a link to the user profile page template. The path can be relative or absolute. This value is referenced when a user clicks another user in the Friends control. Upon clicking the link, the selected user’s profile page appears. The link requires these variables. {0} - represents user ID {1} - represents user display name Below is an example. userprofilepage.aspx?uid={0}&dn={1} |
String |
|
LinkTarget |
Determines the type of window that appears on this Web form when a user clicks an item in the Friends control. The default is _self. _Self - opens in same window _Top - opens in parent window _Blank - opens in new window _Parent - opens in the parent frame |
ItemLinkTargets |
|
MarkupLanguage |
Identify the template markup file that controls the display of the server control. For example, mymarkup.ekml. If the *.ekml file is located in the same folder as the Web form containing the server control, just enter its name. Otherwise, the path to the file can be relative or absolute. |
String |
|
MaxResults |
The maximum number of colleagues to display in the control. 0 (zero) = unlimited. |
Integer |
| RenderOutput |
Allows you determine whether or not to generate output. If you do not, CSS and JS are not registered. The default value is True. True –The control's output is generated. False – The control fetches data from the backend but generates no output. You are responsible for generating output using XML or DataClasses |
Boolean |
|
ShowSortingOptions |
Determines if sorting options appear on the control. If set to True, the following options appear: Colleagues - all current colleagues Pending - colleagues who sent you a colleague request that you have not yet accepted Invited - colleagues to whom you have sent colleague requests |
Boolean |
|
Stylesheet |
Specify the path to a style sheet for use with the server control. The location can be relative or absolute. Leave blank to use the default style sheet. Warning! If you enter a valid EkML file at the MarkupLanguage property, the Stylesheet property is ignored. |
String |
|
SuppressWrapperTags |
Suppresses the output of the span/div tags around the control. The default is False. True - Suppress wrap tags. False - Allow wrap tags. |
Boolean |
|
WrapTag |
Allows a developer to specify a server control’s tag. The default is Span. Span—The <span> tag is used to designate an inline portion of an HTML document as a span element. Div—The <div> tag is used when you want to apply attributes to a block of code. Custom—Allows you to use a custom tag. |
String |
