Setting up Single Sign On
The Single Sign On login process uses the autologin.aspx file in the workarea/SSO directory. Once set up, user authentication is enabled from any domain that this server can reach. For example, if Ektron CMS400.NET is located in a third level domain, users from third, second, and first level domains can authenticate.
There are several versions of the setup instructions, depending on the IIS version your server runs.
Setting up Single Sign On Using IIS6
Setting up Single Sign On Using IIS7
Setting up Single Sign On Using IIS7.5
After completing these procedures, enable Active Directory within Ektron CMS400.NET (if it isn’t already enabled). See Also: Setup Guidelines
Ektron recommends enabling the automatic addition of users and groups. See Also: Managing Users and Groups in Active Directory Integration Mode
Setting up Single Sign On Using IIS6
Setting up Single Sign On with IIS 6 involves these procedures.
Modifying Web.config for Single Sign On
Adjusting Security Settings for the Site Root Folder
Adjusting Security Settings for autologin.aspx
Adjusting the Login Server Control
Modifying Web.config for Single Sign On
1. Open your site root folder.
2. Open the web.config file.
3. Find the ek_AUTH_protocol element.
4. Change its value to GC or LDAP. For example:
<add key="ek_AUTH_Protocol" value="GC" />
5. Find the authentication element.
6. Change the value of the impersonate attribute to true. It should look like this:
<authentication mode="Windows" />
<identity impersonate="true" userName="" password=""/>
Adjusting Security Settings for the Site Root Folder
1. Go to Windows Control Panel > Administrative Tools > Internet Information Services.
2. Within IIS, go to Web Sites and select your Ektron CMS400.NET site.
3. Right click your Ektron CMS400.NET site folder and select Properties.
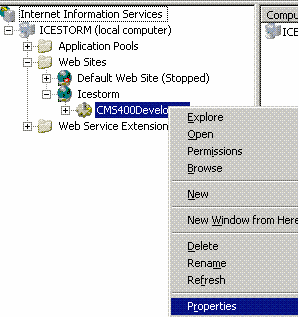
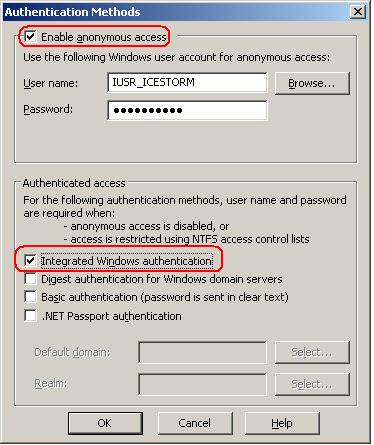
4. Click the File/Directory Security tab then the top Edit button.
5. Uncheck everything except Anonymous Access and Integrated Windows authentication. The anonymous access account should be a domain account, preferably the root of the Active Directory tree.
Adjusting Security Settings for autologin.aspx
1. Go to Windows Control Panel > Administrative Tools > Internet Information Services.
2. Within IIS, go to Web Sites > your Web site’s root folder > Workarea > SSO > autologin.aspx.
3. Right click autologin.aspx and select Properties.
4. Click the File security tab and the top Edit button.
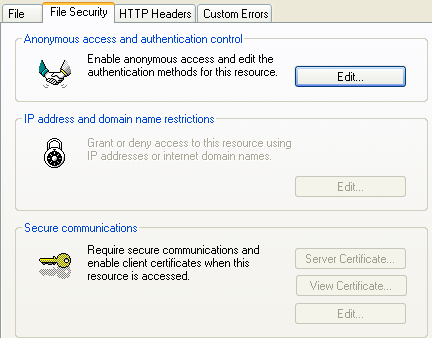
5. Under Authenticated Access, uncheck all except Integrated Windows Authentication.
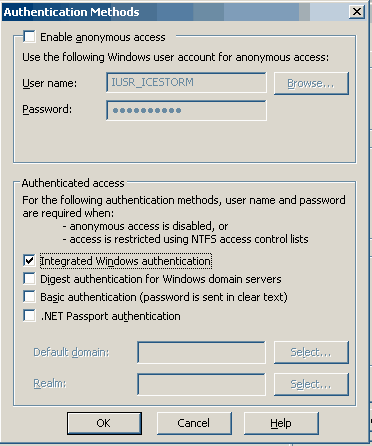
As a result of these settings, autologin.aspx passes credentials from the logged-in user's desktop.
Adjusting the Login Server Control
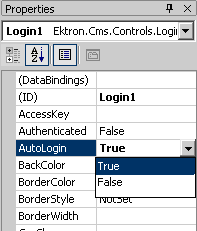
In Visual Studio.NET, open the Login server control and set the AutoLogin property to True. See Also: Login Server Control
Setting up Single Sign On Using IIS7
Modifying Web.config for Single Sign On
Adjusting Security Settings for the Site Root Folder
Adjusting Security Settings for autologin.aspx
Adjusting the Login Server Control
Modifying Web.config for Single Sign On
1. Open the site root/web.config file.
2. Find the ek_AUTH_protocol element.
3. Change its value to GC or LDAP. For example:
<add key="ek_AUTH_Protocol" value="GC" />
4. Find the authentication element.
5. Change the value of the impersonate attribute to false. It should look like this:
<authentication mode="Windows" />
<identity impersonate="false" userName="" password=""/>
6. Comment out the MyDigestAuthenticationModule only.
<httpmodules>
<!--
<add name="DigestAuthenticationModule" type="Ektron.ASM.EkHttpDavHandler.Security.DigestAuthenticationModule,Ektron.ASM.EkHttpDavHandler" />
-->
<add name="ScriptModule" type="System.Web.Handlers.ScriptModule, System.Web.Extensions, Version=1.0.61025.0, Culture=neutral, PublicKeyToken=31bf3856ad364e35" preCondition="integratedMode" />
<add name="EkUrlAliasModule" type="UrlAliasingModule" preCondition="integratedMode" />
</modules>
Adjusting Security Settings for the Site Root Folder
1. Go to Windows Control Panel > Administrative Tools > Internet Information Services.
2. Within IIS, go to Sites and select your Ektron CMS400.NET site.
3. From the right panel, select Authentication.
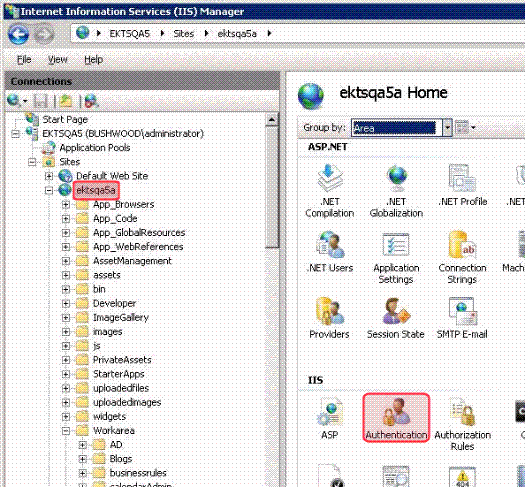
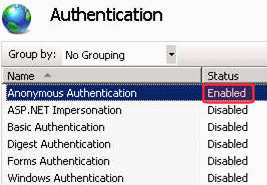
4. On the Authentication screen, enable Anonymous Authentication.
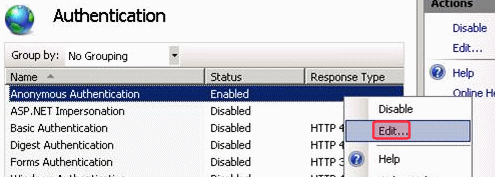
5. Select Anonymous Authentication and click Edit.
6. Set the credentials to a specific user with a domain account, preferably the root of the Active Directory tree.
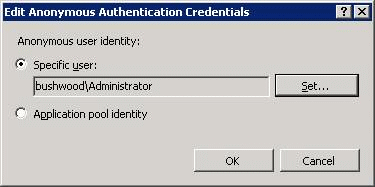
7. Click Set to select the user.
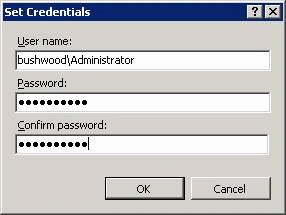
8. Enter the username and password. Confirm the password.
Adjusting Security Settings for autologin.aspx
1. Go to Windows > Control Panel > Administrative Tools > Internet Information Services (IIS) Manager.
2. Within IIS, go to Web Sites > your Web site’s root folder > Workarea > SSO > autologin.aspx.
Note: Make sure your screen is set to Content View (circled in the following illustration).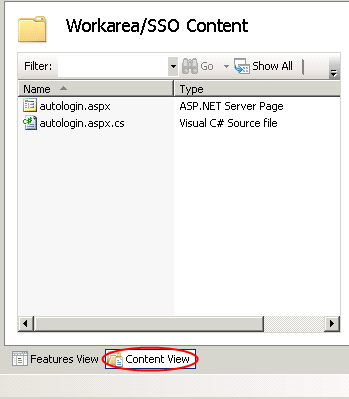
3. From the right panel, enable Windows Authentication.
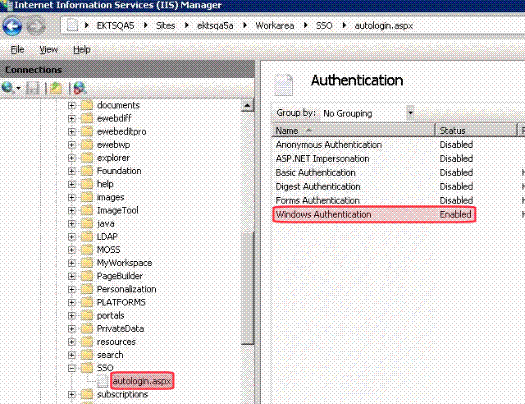
As a result, autologin.aspx passes credentials from the logged-in user's desktop.
Setting up Single Sign On Using IIS7.5
Modifying Web.config for Single Sign On
Set Impersonate at the Application Pool
Adjusting Security Settings for the Site Root Folder
Adjusting Security Settings for autologin.aspx
Modifying Web.config for Single Sign On
1. Open the site root/web.config file.
2. Find the ek_AUTH_protocol element.
3. Change its value to GC or LDAP. For example:
<add key="ek_AUTH_Protocol" value="GC" />
4. Find the authentication element.
5. Change the value of the impersonate attribute to false. It should look like this:
<authentication mode="Windows" />
<identity impersonate="false" userName="" password=""/>
6. Comment out the MyDigestAuthenticationModule only.
<httpmodules>
<!--
<add name="DigestAuthenticationModule" type="Ektron.ASM.EkHttpDavHandler.Security.DigestAuthenticationModule,Ektron.ASM.EkHttpDavHandler" />
-->
<add name="ScriptModule" type="System.Web.Handlers.ScriptModule, System.Web.Extensions, Version=1.0.61025.0, Culture=neutral, PublicKeyToken=31bf3856ad364e35" preCondition="integratedMode" />
<add name="EkUrlAliasModule" type="UrlAliasingModule" preCondition="integratedMode" />
</modules>
Set Impersonate at the Application Pool
Instead of setting impersonate in the web.config file, you set it at the AppPool level. To do that, follow these steps.
1. Open IIS Manager.
2. Click Application Pools.
3. Select the app pool for your site.
4. Click Advanced Settings, on the right side of the screen.
5. Set the identity to be a domain account. To do this, under Process Model, find the Identity property.
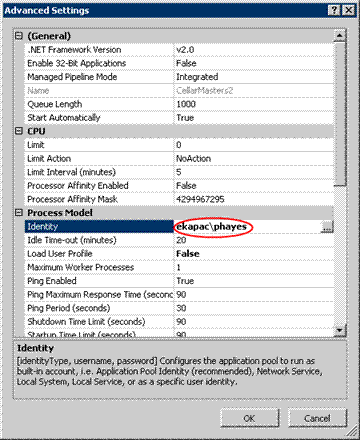
6. Click ellipsis ( ).
).
7. The Application Pool Identity Screen appears.
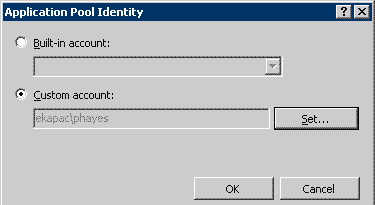
8. Select Custom account and press the Set... button.
9. The Set Credentials screen appears.
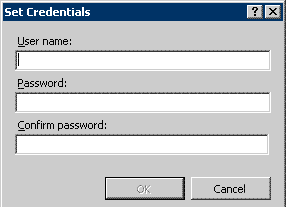
10. Enter your user name and password.
Adjusting Security Settings for the Site Root Folder
See Adjusting Security Settings for the Site Root Folder
Adjusting Security Settings for autologin.aspx
See Adjusting Security Settings for autologin.aspx
