Setting up a Multiple Site Search Using Virtual Directories
Use the following procedure if you want to set up two sites but use a single database. The steps below allow you to search from either site to find the same content.
In this example, the first site contains the database, while the second site uses virtual directories to point to content in the first site.
1. Set up the first site and create a database for it in the normal manner.
2. Set up the second site, but when you are prompted to set up the database, click No.

3. The following message appears. Press OK.

4. In the first site, open the web.config file.
5. Copy the database connection information for your database, as indicated below.
<connectionStrings>
<!--FOR SQLSERVER-->
<add name="Ektron.DbConnection" providerName="System.Data.SqlClient" connectionString="server=(local);database=CMS400Min;Integrated Security=TRUE;user=;pwd=;" />
Note: Your information may be different from the sample above.
In the second site, open the web.config file. Then, overwrite the database information with the text you copied in Step 5.
6. Copy the catalog information from the first site to the second. To do this, open the first site’s web.config file, and copy the contents of the <providers> element (illustrated below).
<providers>
<add name="MSIndexServer" type="Ektron.Cms.WebSearch.SearchProviders.MSIndexProvider, Ektron.Cms.WebSearch" catalogName="CMS400Min3152007121250Publish" privateCatalogName="CMS400Min3152007121250Private" pageSize="10" description="MS Index Server Provider"/>
<add name="MSIndexDialectServer" type="Ektron.Cms.WebSearch.SearchProviders.MSIndexDialectProvider, Ektron.Cms.WebSearch" catalogName="CMS400Min3152007121250Publish" privateCatalogName="CMS400Min3152007121250Private" pageSize="10" description="MS Index Server Dialect2 Provider"/>
</providers>
Note: The catalog names are examples. You catalog names may be different.
7. In the second site, open the web.config file. Then, overwrite the <providers> information with the text you copied in Step 7.
8. Open the folder that contains the first site. Copy the AssetManagement.config file.
9. Open the folder that contains the second site. Overwrite the AssetManagement.config file in that folder with the file you copied in Step 9.
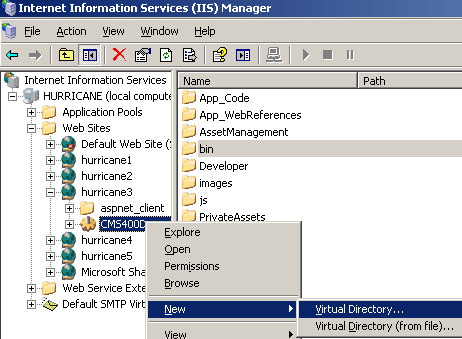
10. Set up the virtual directories. To do that, follow these steps.
- In IIS, open the second Web site you created in Steps 2 and 3
- Delete the Assets folder
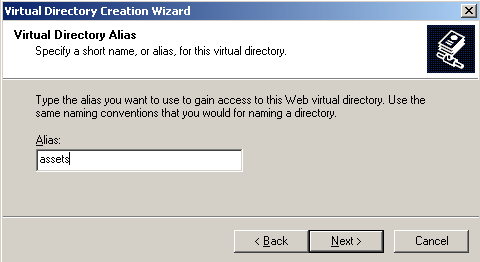
- Create a new virtual directory named Assets


- When prompted to specify a path to the new Assets folder, navigate to the first site’s Assets folder
- When you finish setting up the virtual folder to Assets directory, set up virtual directories in the same manner for the following directories: PrivateAssets, uploaded files, and uploaded images. Remember to delete the folder in the second site before creating the virtual directory.
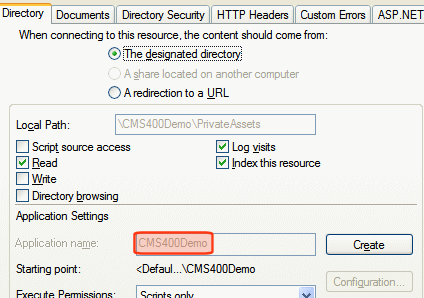
- Make sure that none of the folders is set up as an application. To do that, open IIS, right click each folder and select properties. On the Directory tab, the Application name field should be grayed out, as shown below.

