Manual Aliasing
When using manual aliasing, you choose a page name. Next, you specify the content to appear whenever anyone enters the URL using that name into a browser address field. For example, you can alias www.example.com/cms/index.aspx as www.example.com/cms/Launch.html. From then on, the content can be identified either by its original URL or its alias.
You can assign any number manual of aliases to a content block.
Note: You cannot manually alias the root of your Web site (for example, www.example.com). You can, however, alias everything below that.
Manual Aliasing and Multi-Site
If your Ektron CMS400.NET deployment uses multi-site, the following restrictions apply to manual aliasing.
Any manual alias applied to the root site cannot be applied to any of the additional sites
Any manual alias applied to an additional site cannot be applied to the root site
However, the same manual alias can be applied to any number of additional sites.
Enabling/Disabling Manual Aliasing
To activate manual aliasing, follow this path to the URL Aliasing Configuration screen: Settings > Configuration > URL Aliasing > Settings.
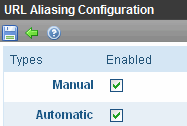
The screen indicates if manual aliasing is currently on or off. To change its state, click Edit ( ), check or uncheck the box, and click Save (
 ).
).
Assigning a Manual URL Alias to Content
Two screens let you manually alias content.
|
Screen/tab |
Who is authorized to use |
Can create/update these manual aliases |
For more information, see |
|
Page Name Maintenance |
members of Administrators group |
an unlimited number of primary and secondary |
|
|
Alias tab of View Content screen (see image below) |
members of Administrators group users assigned Alias-Edit role |
primary (Alias tab displays but does not let users change secondary aliases) |
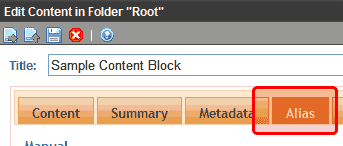
Adding a Manual Alias via the Page Name Maintenance Screen
Prerequisites
Manual aliasing is enabled. See Also: Enabling/Disabling Manual Aliasing
You are a member of the Administrators group
To add a manual alias via the Page Name Maintenance screen, follow these steps.
1. Go to Workarea > Settings > Configuration > URL Aliasing > Manual.
2. The Manual Aliased Page Name Maintenance screen appears.

The following table explains the buttons on the screen.
|
Button |
Description |
For more information, see |
|
|
Add manual alias |
|
|
|
Delete manual alias |
|
|
|
Manually clear cache |
The following table explains the fields on the screen.
|
Field |
Description |
|
If you assign more than one manual alias to content, this field designates the primary one. If you only assign one, it is the primary by default. The primary alias appears in the browser when a user hovers the cursor over a link to associated content, such as within a List Summary or a Collection. It also appears in the browser address field after the content is selected. See Example of an Alias in the Browser . If a user views a content block’s Alias tab, he can only see and edit the primary manual alias. See Also: Adding a Manual Alias via the Alias Tab |
|
|
Active |
Indicates if this alias is active. |
|
Lang |
The alias’s language flag. |
|
Alias |
The alias (that is, the page name) that site visitors can enter as part of the URL into a browser to see the associated content. |
|
Original Link |
The content template and variable being aliased. |
|
Content ID |
The ID number of the content assigned to the alias. |
3. To edit an existing manual alias, use the language selector dropdown (see image below) to choose the language of the aliases you want to work with.
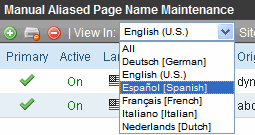
If you are creating a new alias, click Add Alias ( ) and skip to Step 8.
4. If your Ektron CMS400.NET version supports multi-site configurations, use the Site dropdown to choose the site.
5. Click the alias you want to edit.
Note: If there are many aliases, use the search to help find one. You can filter aliases by alias name, Content ID, etc.
6. The View Alias screen appears. Click Edit ( ).
).
7. The Add/Edit Manual Alias screen appears.
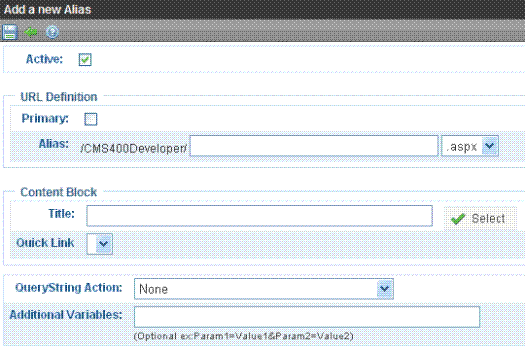
8. If Editing an Existing Alias
If this is not the primary alias, you can check or uncheck the Active checkbox. Only active aliases can be entered into the browser address field to display the assigned content.
If this is the primary alias, you cannot uncheck it. If you want to inactivate a primary alias, first assign another alias to be the primary for this content block. Then, return to this screen and make this alias inactive. Alternatively, you can delete a primary alias.
Check the Active checkbox if you want this alias to be active.
9. Check the Primary box if you want this to be the primary alias. See Also: Primary
If another alias is the primary when you check this box, the other alias is no longer the primary.
10. In the Alias field, enter the alias name. It cannot include the following characters: (comma), (space), \, <, >, “,:, |. Also, it must be unique within this site and language.
To the right of Alias Name is a pull-down of valid extensions. Select one to apply to this alias. Extensions are defined on the URL Aliasing Configuration screen. See Also: Extension
11. Click Select a Content Block to choose content. The QuickLink Select window appears.
Note: Only content in the language chosen on the Page Name Maintenance screen appears.
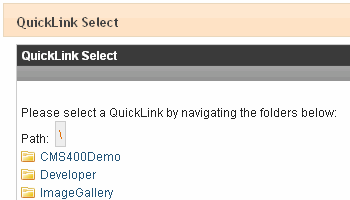
12. Navigate through the folder structure and click the content to which you are assigning the alias.
Note: A folder’s content appears below its subfolder list. You may have to scroll down to see the content.
13. The Title, Link and Quick Link fields fill in, using information from the selected content.
If the content has more than one quicklink assigned to it, select the one to which you are assigning the alias.
14. To learn about the QueryString Action field, go to .
15. Enter the Additional Variables. These are used as query string parameters that can track how visitors arrived at the aliased page. You might use these for marketing campaigns, to analyze the source of an aliased page’s visitors.
For example, the Additional Variables field has ?gclid=CO7gs_L0_ZICFRkTIgodBgV9CQ. Your Web site's analytics software can track the source of the query through the variable.
Note: Within the page load event that returns the query string parameters, use the Request.RawURL() property instead of request.querystring.
16. Click Save ( ).
).
See Also: Manual Aliasing
Adding a Manual Alias via the Alias Tab
Once manual aliasing is enabled, every content block includes an Alias tab. You can use that tab to view and update the content’s primary alias.
Note: If you insert/update an alias via the Alias tab, it only goes live after the content is published.
See Also: Manual Aliasing
Prerequisites
Manual aliasing is enabled. See Also: Enabling/Disabling Manual Aliasing
You are a member of the Administrators group or assigned to the Alias-edit Role.
The Alias tab appears only if both prerequisites are met.
To add a manual URL alias via the Alias tab, follow these steps.
1. In the Workarea, select Content.
2. Navigate to and click the content you want to work with.
3. Click Edit ( ).
).
4. The Edit Content screen appears.

5. Click the Alias tab.
6. In the Primary Alias Name field, enter the name of the primary alias.
The name cannot include the following characters: (comma), (space), \, <, >, “,:, |. Also, it must be unique within this site and language.
7. To the right of Primary Alias Name is a pull-down of valid extensions. Select one to apply to this manual alias.
The extensions are set up in the URL Aliasing Configuration screen’s Extension field. See Also: Extension
8. Save and publish the content.
Viewing a Manual Alias
See Also: Manual Aliasing
To view a manual URL alias, follow these steps.
1. Go to Workarea > Settings > Configuration > URL Aliasing > Manual.
2. On Manual Aliased Page Name Maintenance screen, click the alias you want to view.
3. The alias information appears. To learn about the screen’s fields, see The Add/Edit Manual Alias screen appears..
Editing a Manual URL Alias
You can edit any manual alias via the Edit Alias screen. This lets you change all fields completed when the alias was created: name, assigned content, etc.
Note: You can also edit a content block’s primary alias name via the Alias tab on the content screen. See Adding a Manual Alias via the Alias Tab.
See Also: Manual Aliasing
To edit a manual URL alias, follow these steps.
1. Go to Workarea > Settings > Configuration > URL Aliasing > Manual.
2. On Manual Aliased Page Name Maintenance screen, click the alias you want to edit.
3. The View Alias screen appears. Click Edit ( ).
).
4. The Edit Alias screen appears.
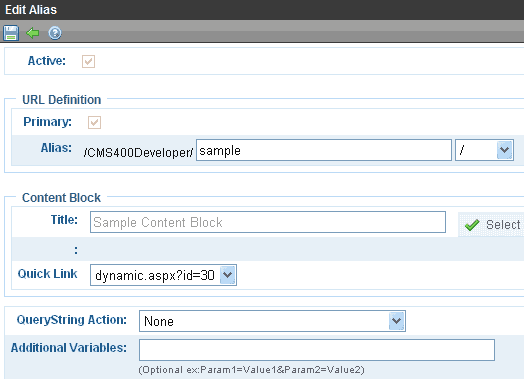
5. Make any changes. To learn about the fields, see If Editing an Existing Alias.
If this is the only alias assigned to the content, you cannot uncheck Primary or Active.
If other aliases are assigned to the content, and you want to make one of them the primary, edit that alias and check the Primary checkbox. You cannot uncheck Primary from this screen.
Also, only secondary aliases can be inactivated by unchecking the Active checkbox.
6. Click Save ( ).
).
Removing a Manual Alias
Just as there are two ways to add a manual alias, there are two ways to remove one.
Removing a Manual Alias via the Content Alias Tab
Removing Manual Alias via the Page Name Maintenance Screen
Removing a Manual Alias via the Content Alias Tab
Using a content block’s Alias tab, you can delete a primary manual alias only if no secondary aliases exist. If secondary aliases exist and you want to delete or replace the primary alias, you must use the Manual Aliased Page Name Maintenance screen. See Also: Removing Manual Alias via the Page Name Maintenance Screen
You can neither see nor delete secondary manual aliases from the Alias tab.
Note: If you delete an alias via the Alias tab, the change only goes live after the content is published.
To remove the primary manual alias by editing the associated content block, follow these steps.
1. Browse to the content block associated with the alias.
2. Click Edit.
3. Click the Alias tab.
4. Delete or replace the value in the Primary Alias Name field.

5. Click Save, Check in, or Publish.
Removing Manual Alias via the Page Name Maintenance Screen
Using the Page Name Maintenance Screen, you can delete the primary and any secondary manual aliases.
Warning! If you want to delete a primary manual alias while secondary aliases exist, you must first designate one of the secondary aliases as the primary. You can only delete the primary alias if no secondary aliases exist.
To remove a manual alias via the Page Name Maintenance Screen, follow these steps.
1. Go to Workarea > Settings > Configuration > URL Aliasing > Manual.
2. On Manual Aliased Page Name Maintenance screen, click Remove ( ).
).
3. Check the box next to all aliases you want to remove.
4. Click Delete ( ).
).
5. Click OK to confirm.

