Assigning a Taxonomy/Category to Content, Users, or Community Groups
The table below summarizes information about assigning a taxonomy/category to content, users or community groups.
|
To assign a taxonomy category to |
Available methods |
Prerequisites |
For more information, see |
|
Content Note: Regardless of the method you use to assign a taxonomy to content, the result is the same. |
from the Edit Content in Folder screen |
Must be authorized to edit the folder’s content You can only select from taxonomies assigned to the content’s folder |
|
|
from the Content Tab > Taxonomy screen |
Must be member of administrators group or Taxonomy administrator |
||
|
Ektron CMS400.NET Users |
from the Assign Item(s) to Taxonomy screen
|
Taxonomy’s Configuration > User check box is checked | |
| Membership Users |
from the Assign Item(s) to Taxonomy screen after logging into a Community site, editing the user profile |
Taxonomy’s Configuration > User check box is checked | Assigning a Taxonomy/Category to a Membership User |
| Community Group |
from the Workarea’s Assign Item(s) to Taxonomy screen from the Workarea’s Community Group Area after logging into a Community site, editing the community group profile |
Taxonomy’s Configuration > Group check box is checked | Assigning a Taxonomy/Category to a Community Group |
This section also contains the following topics.
How Content Authors Assign Taxonomy Categories
How Administrators Assign Taxonomies to a Folder
How Administrators Assign a Taxonomy/Category
How Content Authors Assign Taxonomy Categories
Ektron CMS400.NET lets content authors assign a taxonomy category to content. They do this by navigating to a content block, clicking its Category tab, opening a taxonomy, and checking the correct level.
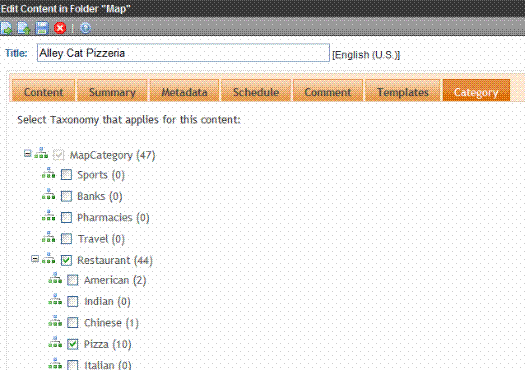
However, all taxonomies may not be available to every content item. Use a folder property's Taxonomy area to control which taxonomies can be assigned to content in that folder.
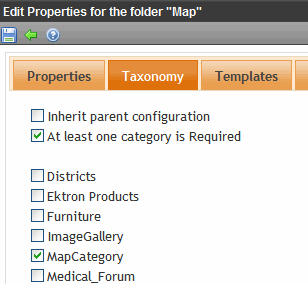
For example, a folder’s content consists of restaurants, and you want to restrict users to the Restaurant taxonomy -- users cannot assign other categories to that folder’s content.
How Administrators Assign Taxonomies to a Folder
To make a taxonomy available to a folder, follow these steps.
1. Navigate to the folder by clicking Content > Folders then click a folder.
2. Choose View > Properties.
Alternatively, hover the cursor over the folder, right click the mouse, and select View Properties.
3. Click Edit ( ).
).
4. On the Taxonomy tab, uncheck the Inherit parent configuration checkbox. See Also: Inheriting Taxonomies from a Parent Folder
5. Check taxonomies that should be available to this folder.

6. From now on, users editing content in this folder can assign categories from the selected taxonomies.
Inheriting Taxonomies from a Parent Folder
Unlike some folder properties, Taxonomy settings are not inherited from a parent folder by default. But you can cause them to be inherited if that is appropriate.
If you are not working on the root folder and the appropriate set of Taxonomies is applied to a folder’s parent folder, go to the folder’s properties screen and check the Inherit parent configuration checkbox.
How Administrators Require the Assignment of at Least One Category
In the folder properties, you can require all content to be assigned at least one taxonomy category. If you do, when content in that folder is saved, Ektron CMS400.NET checks to see that at least one taxonomy category has been assigned. If none is found, the user is notified that he must assign a taxonomy category before he can save the content.
To set a folder-level requirement for all content to be assigned a taxonomy category, follow these steps.
1. Navigate to the folder.
2. Choose View > Properties.
Alternatively, hover the cursor over the folder, right click the mouse, and select View Properties.
3. Click the Taxonomy Tab.
4. Check the at least one category Required checkbox.
How Administrators Assign a Taxonomy/Category
Assigning Content to a Taxonomy/Category
Assigning a Folder to a Taxonomy/Category
Assigning a Taxonomy/Category to a Community Group
Assigning a Taxonomy/Category to a Membership User
Assigning Content to a Taxonomy/Category
Prerequisite
You can perform this procedure only if a taxonomy’s Configuration > Content check box is checked.
Members of the administrators group or taxonomy administrators can assign taxonomy categories to content via the View All Categories of Taxonomy screen. See Also: Defining Roles
1. From the Workarea, go to Content > Taxonomies.
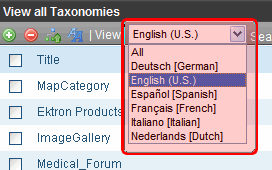
2. Select a language whose taxonomies you want to work with (see image below). You can choose All.
3. Select a taxonomy.
4. Select the category to which you want to assign content.
5. Click Assign Items to Taxonomy ( ).
).
Alternatively, right click the category and choose Assign Item(s).
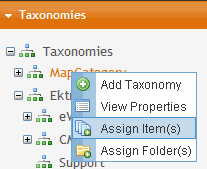
As another alternative, navigate to a content folder, click items to be assigned, right click the mouse and select Copy. Then, locate the taxonomy category, right click the mouse, and select Paste Items to Taxonomy.
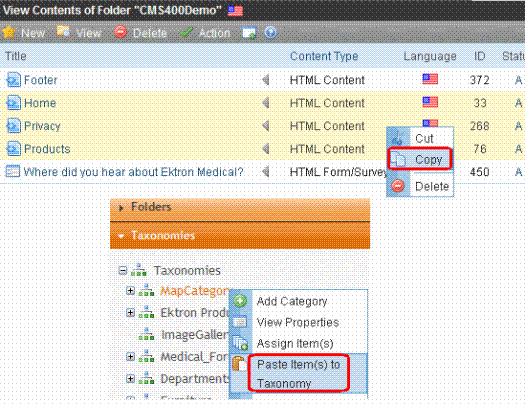
6. From the View dropdown, choose the object type of the item to associate. See Also: Assigning a Taxonomy Configuration

7. If you select Content , narrow down the type of content you wish to see via the Type pulldown.

All types - both archived and active content
Content - active content only
Archived Content - only content that has been archived and set to remain on site. See Also: Setting Archive Options
8. Navigate to the folder that contains the content you want to assign to the taxonomy or category.
or
Search for the user or community group to assign to the taxonomy or category.
Note: Folder content appears below the folder list (see below). Also, only content in the selected language appears.
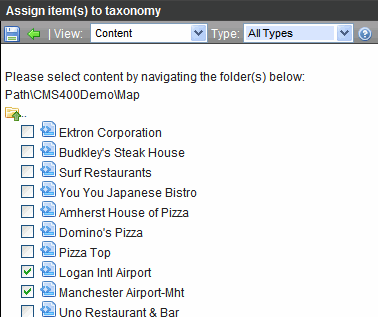

9. Check the box to the left of content, user, or community group you want to assign. You can assign all types of content, even blogs.
Assigning a Folder to a Taxonomy/Category
Prerequisites:
You can perform this procedure only if a taxonomy’s Configuration > Content check box is checked.
Only administrators or users to whom the Taxonomy-Administrator role has been assigned see the Content > Taxonomies option. See Also: Defining Roles
Note: If you assign a folder, the internal relationship is between the folder’s content and taxonomy category. The folder is merely a convenience for creating this relationship. There is no data connection between the folder and the taxonomy category.
You can assign a folder to a taxonomy, thereby displaying published content in the folder when the page is viewed. As content is added to or deleted from the folder, the taxonomy on the Web page changes dynamically.
For example, you have a “Top News Stories” folder, in which newer news items are frequently added, and old ones are deleted. The taxonomy only shows the latest news items. The updating of the content is handled by the taxonomy automatically.
Warning! If you move content from a folder to which a taxonomy category is assigned, the category remains with the content in the new folder. If the new folder also has a taxonomy category assigned, the new category is also applied to the moved content.
To assign a folder to a taxonomy category, follow these steps.
1. From the Ektron CMS400.NETWorkarea, choose Content > Taxonomies.
2. Select the language of the taxonomy on which to work.
3. Select the taxonomy or category to which you want to assign a folder.
4. Click Assign Folders to Taxonomy ( ).
).
Alternatively, right click the category and choose Assign Folder(s).
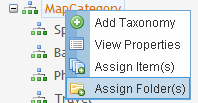
5. Navigate to the folder you want to assign to the taxonomy or category.
6. Check the box to the left of all folders you want to assign.
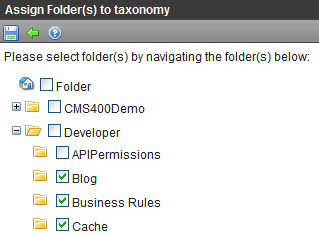
Warning! Only checked folders are assigned to the taxonomy/category. Checking a parent folder has no effect on its child folders.
Assigning a Taxonomy/Category to a Community Group
Prerequisite
You can perform this procedure only if a taxonomy’s Configuration > Group check box is checked.
You can assign a taxonomy/category to a community group from either a Community web site or the Ektron CMS400.NET Workarea.
Assigning a Taxonomy/Category to a Community Group from the Workarea Community Group Area
Assigning a Taxonomy/Category to a Community Group from the Workarea
Assigning a Taxonomy/Category to a Community Group from a Community Web Site
Assigning a Taxonomy/Category to a Community Group from the Workarea Community Group Area
Note: To learn about how a group's the taxonomy/category assignment helps membership users find a community group, see Filtering Search Results by Category
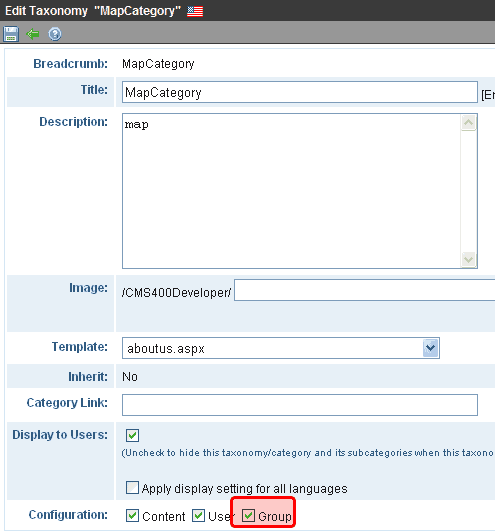
1. Navigate to Settings > Community Management > Community Groups .
2. Select a community group.
3. Click Edit ( ).
).
4. Click the Category Tab.
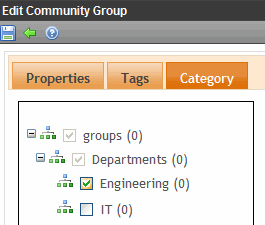
5. Check the taxonomies or categories to apply.
6. Click Save ( ).
).
Assigning a Taxonomy/Category to a Community Group from the Workarea
Members of the administrators group or taxonomy administrators can assign taxonomy categories to community groups via the View All Categories of Taxonomy screen. See Also: Defining Roles
1. From the Workarea, go to Content > Taxonomies.
2. Select a language whose taxonomies you want to work with (see image below). You can choose All.

3. Select a taxonomy.
4. Select the category to which you want to assign content.
5. Click Assign Items to Taxonomy ( ).
).
Alternatively, right click the category and choose Assign Item(s).

6. From the View dropdown, click Community Groups.

7. A search field appears. Click the search icon to see a list of all community groups. Or, enter one or more letters, and only groups containing them appear.
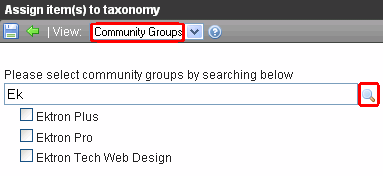

8. Check the box to the left of the community groups you want to assign.
9. Click Save ( ).
).
Assigning a Taxonomy/Category to a Community Group from a Community Web Site
1. Log into the Community Web site.
2. Click the Community Groups link. The location of this link will vary, depending on how your site is set up.
3. Click the community group that you want to edit.
4. Click Edit Group. See example below.
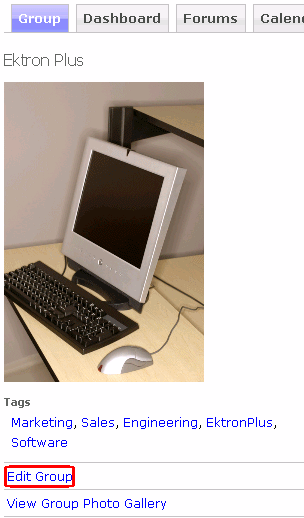
5. Click the Category tab.
6. Check the taxonomies or categories to apply.
7. Click Save ( ).
).
Assigning a Taxonomy/Category to a Membership User
You can assign a taxonomy/category to a membership user from a Community web site or from the Workarea.
Prerequisite
You can perform this procedure only if a taxonomy’s Configuration > User check box is checked.
Assigning Taxonomy/Category to Community Group from Web Site
Assigning Taxonomy/Category to Community Group from Workarea
Assigning Taxonomy/Category to Community Group from Web Site
Log into the Community Web site.
8. Click the Community Groups link. The location of this link will vary, depending on how your site is set up.
9. Click the community group whose members you want to edit.
10. Click Members. See example below
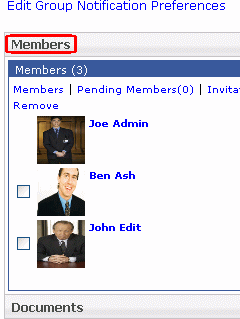
11. Click a user.
12. Click Edit Profile.
13. Click the Category tab.
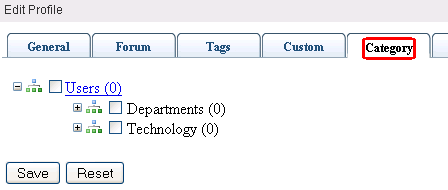
14. Check the taxonomies or categories to apply.
15. Click Save ( ).
).
Assigning Taxonomy/Category to Community Group from Workarea
Members of the administrators group or taxonomy administrators can assign taxonomy categories to community group Members via the View All Categories of Taxonomy screen. See Also: Defining Roles
1. From the Workarea, go to Content > Taxonomies.
2. Select a language whose taxonomies you want to work with (see image below). You can choose All.

3. Select a taxonomy.
4. Select the category to which you want to assign content.
5. Click Assign Items to Taxonomy ( ).
).
Alternatively, right click the category and choose Assign Item(s).

6. From the View dropdown, click Members.

7. A search field appears. Click the search icon to see a list of all community members. Or, enter one or more letters, and only members containing them appear. You can also use the pulldown to specify if you are searching the membership user's first name, last name or user name.
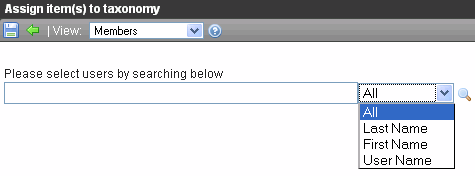
8. Check the box to the left of the membership users you want to assign.
9. Click Save ( ).
).
Assigning a Taxonomy/Category to a User
Members of the administrators group or taxonomy administrators can assign taxonomy categories to Ektron CMS400.NET users via the View All Categories of Taxonomy screen. See Also: Defining Roles
1. From the Workarea, go to Content > Taxonomies.
2. Select a language whose taxonomies you want to work with (see image below). You can choose All.

3. Select a taxonomy.
4. Select the category to which you want to assign content.
5. Click Assign Items to Taxonomy ( ).
).
Alternatively, right click the category and choose Assign Item(s).

6. From the View dropdown, click CMS Authors.

7. A search field appears. Click the search icon to see a list of all CMS users (that is, authors). Or, enter one or more letters, and only users containing them appear. You can also use the pulldown to specify if you are searching the user's first name, last name or user name.

8. Check the box to the left of the users you want to assign.
9. Click Save ( ).
).
