Inserting Server Controls Programmatically
Besides using the drag-and-drop method to insert a server control (explained in Inserting Server Controls Using Drag and Drop), you can insert one programmatically. You might prefer to insert server controls programmatically for several reasons, such as
you want the control to be loaded into memory only under certain conditions. In this case, insert the logic that only displays the control if the condition exists.
you want to display only certain properties of an object, such as the title of last edited date of a content block.
Note that you can drag and drop controls on your page then customize them using code behind. For more information, see:Using Drag & Drop and Programmatically Together.
Steps to Insert a Server Control Programmatically
To insert an Ektron server control programmatically, follow these steps.
Step 2: Create an Instance of the New Control
Step 5: Use .text Property to Display the Control
Each step is described below. These steps show an example of using the Collection Server Control.
Step 1: Declare the Namespace
Before inserting the server control, you can declare the namespace at the top of the code behind Visual Basic file, as shown below.
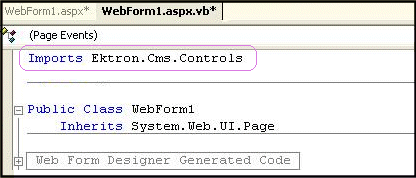
Note: You do not need to declare a namespace. However if you do not, you must fully qualify objects that you create.
|
Best Practice For any customization of the CMS, classes or controls that inherit from Ektron classes, it is recommend that you create your own namespace within 'Ektron.Cms.Custom'. For example, if your company is 'AcmeExampleTech, Inc.' you should create all of your custom classes within the namespace 'Ektron.Cms.Custom.AcmeExampleTech'. |
Step 2: Create an Instance of the New Control
Next, declare a control as an object in the code behind. In this example, we create a collection named MyColl.
dim MyColl as New Collection
or
dim MyColl as new Ektron.Cms.Controls.Collection
With C#, use this syntax.
Ektron.Cms.Controls.Collection MyColl = new
Ektron.Cms.Controls.Collection();
You can declare any server control as an object by using the server control name in the List of Server Controls. Another example would be: Dim MyMdl as New MetaDataList.
Step 3: Set the Properties
Note: For descriptions of the properties and how to use them, see Server Control Properties in Code Behind.
After inserting the control, you can set the properties that you want to display on the page. For example:
Dim MyColl as New Collection
MyColl.DefaultCollectionID = 4
MyColl.Page = Page
or if you are using code behind to insert the control,
dim MyColl as new Ektron.Cms.Controls.Collection
MyColl.DefaultCollectionID = 4
MyColl.ID = “Collection1”
MyColl.Page = Page
With C#, use this syntax.
Ektron.Cms.Controls.Collection MyColl = new
Ektron.Cms.Controls.Collection();
MyColl.DefaultCollectionID = 4;
MyColl.ID = “Collection1”;
MyColl.Page = Page;
These lines tell the page to display CollectionID 1 unless otherwise specified.
Warning! When using code behind to add a server control to your Web form, you must set the Page object for the server control to Page. For example, Mycoll.Page = Page This line needs to appear between Dim new server control line and the Fill() line. This line is not added when dragging and dropping a server control on a Web form. See Also: Referencing the Page Property.
Note: If you do not know an object’s ID number, you can switch to Design mode, drag and drop the object, then use the CMS Explorer to find the ID number. (See Using CMS Explorer to Browse Your Ektron CMS400.NET Site.) If you do this, remember to delete the dropped object when you are done.
You can also obtain the ID number via the Workarea.
Dim MyColl as New Collection
MyColl.ID = “Collection1”
MyColl.DefaultCollectionID = 4
MyColl.Page = Page
MyColl.Random = True
This line sets the Random property to true. See Also: Random.
Step 4: Call the Fill Method
Because there is no render event when using objects as components not as controls, use the Fill method to fill an object’s properties on the page. An example is below.
Dim MyColl as New Collection
MyColl.ID = “Collection1”
MyColl.DefaultCollectionID = 4
MyColl.Page = Page
MyColl.Random = True
MyColl.Fill()
Step 5: Use .text Property to Display the Control
Finally, use the .text property to determine what appears on the Web page. For example, to display the first item in a collection, use this syntax.
Note: Before adding this line you need to drag and drop a label on your Web form.
Dim MyColl as New Collection
MyColl.ID = “Collection1”
MyColl.DefaultCollectionID = 4
MyColl.Page = Page
MyColl.Random = True
MyColl.Fill()
Label1.Text = myColl.EkItems(0).Title
To display all items in a collection, use this syntax.
Dim myColl As New Ektron.Cms.Controls.Collection
Dim ekitem As New Ektron.Cms.Common.ContentBase
MyColl.DefaultCollectionID = 2
MyColl.ID = “Collection1”
MyColl.Page = Page
MyColl.Fill()
Label1.Text = "<ul>"
For Each ekitem In myColl.EkItems
Label1.Text &= "<li><a href=""" & ekitem.QuickLink & """>" & ekitem.Title & "</a>"
Next
Label1.Text &= "</ul>"
This example displays the quick link for every content block in the collection, formatted as a bulleted list. You can use similar code to display a List Summary or search results. The following explains the new (red) code above.
label1.Text = "<ul>" displays the opening tag for the bulleted list
For Each ekitem In myColl.EkItems creates a loop for all content blocks in the collection
label1.Text &= "<li><a href=" & ekitem.QuickLink & ">" & ekitem.Title & "</a></li>" for each content block in the collection, displays its quicklink and title
Next loops through all content blocks in the collection
label1.Text &= "</ul>" closes the bulleted list
Server Control Properties in Code Behind
Every server control has properties associated with it that you can only access programmatically. This subsection explains, what they are, how to access them, and how to use them.
Displaying Properties for a Control
Mutual Server Control Properties in Code Behind
Accessing Additional Properties
Displaying Properties for a Control
You can use Visual Studio’s intellisense feature to display a control’s properties. The intellisense box appears as soon as you insert the period (.) after the object, as illustrated below.
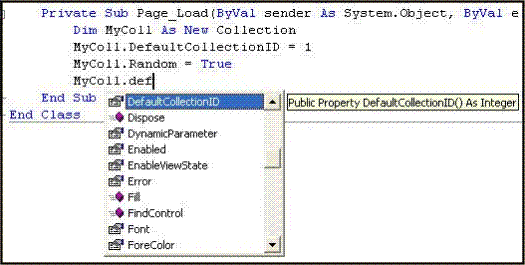
The intellisense box displays all properties that can be applied. For a description of Ektron’s standard server control properties, see List of Server Controls. To learn about native VS properties, see its documentation.
The property’s tooltip text indicates its type. In the above example, you can see that the DefaultCollectionID’s type is integer.
For more information about accessing Ektron CMS400.NET object properties, see Customizing the Server Control in the Code Behind.
Mutual Server Control Properties in Code Behind
There are several read-only properties that can be called in the code behind and used by every server control. The list below explains these properties.
Note: The properties do not display values within Visual Studio during design time. Instead, they only display values at run time, which are dependent on the user’s login status.
|
Property |
Value |
Data Type |
|
IsLoggedIn |
Tells if a user is logged in to Ektron CMS400.NET. True = User is logged in False = User is not logged in |
Boolean |
|
LoggedInUserName |
Gets the Ektron CMS400.NET user name to display. |
String |
|
LoggedInUserID |
Gets the Ektron CMS400.NET ID of the user to display. |
Integer |
These properties will allow you to personalize any page with your users names and IDs, and show if they are logged in. Here is an example of using these properties in code behind.
Note: You must be logged in to Ektron CMS400.NET for this example to show your name and ID.
1. Drag an Ektron CMS400.NET server control onto a Web form.
2. Drag three Literals onto the Web form.
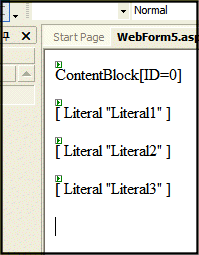
3. Open the code behind for the Web form.
4. Add the following code to the Page_Load event.
Literal1.Text = ContentBlock1.IsLoggedIn
If ContentBlock1.IsLoggedIn Then
Literal2.Text = ContentBlock1.loggedInUserName & " is logged in "
Literal3.Text = ContentBlock1.loggedInUserID & " is the User ID "
End If
5. Build and run the solution.
6. Browse to the login page and log in.
7. Browse to the new Web form you added.
8. The login information is displayed.
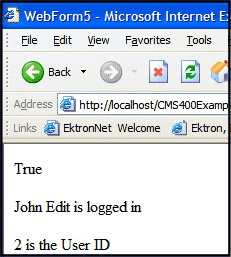
Accessing Additional Properties
In addition to the standard properties, Ektron CMS400.NET provides access to additional properties for the following objects.
ListSummary
Collection
Search
ContentBlock
FormBlock
To access additional properties, use the same syntax you use for standard properties but add .ekitem or .ekitems after the object. Here is an example.
dim MyCB as New ContentBlock
MyCB.DefaultContentID = 30
MyCB.ID = “ContentBlock1”
MyCB.Page = Page
MyCB.Fill()
label1.text = MyCB.EkItem.dateCreated
or
dim MyCB as new Ektron.Cms.Controls.ContentBlock
MyCB.DefaultContentID = 30
MyCB.ID = “ContentBlock1”
MyCB.Page = Page
MyCB.Fill()
label1.text = MyCB.EkItem.dateCreated
Warning! To access additional properties for the Collection, ListSummary, and Search objects, use ekitems, not ekitem. For example: MyColl.ekitems(0).dateCreated. where (0) is the index of the array. For more Information on using ekitems, see Accessing Items in an Array.
You can use intellisense to select from a list of additional object properties, as shown below.
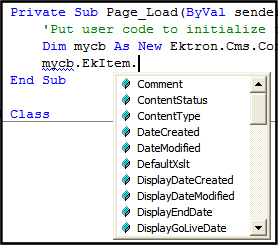
The additional properties are listed below.
Note: The following properties are read-only. For example, you can get a content block’s ID and pass it through to another part of the code, however you cannot set a content blocks ID to be shown. mycb.Ekitem.id = 8 will not set a content block’s ID. The correct way to set a content blocks ID is DefaultContentID = 8.
|
Property |
Description |
For more information, see |
|
Comment |
The content block’s comment. |
|
|
The status of the content block. approved checked out checked in expired pending deletion pending expiration pending start date submitted |
||
|
ContentType |
One of the following all types archived content archived forms content forms |
To learn about archived content, see Scheduling Content to Begin and End. |
|
DateCreated |
The date when the content block was created, formatted as a .NET date type. |
|
|
DateModified |
The date when the content block was modified, formatted as a .NET date type. |
|
|
DefaultXslt |
The default XSLT used to display the content. |
|
|
DisplayDateCreated |
The date when the content block was created. It is formatted as a string that represents Ektron CMS400’s display of the date. |
|
|
DisplayDateModified |
The date when the content block was edited. It is formatted as a string that represents Ektron CMS400’s display of the date. |
|
|
DisplayEndDate |
The content block’s end date. It is formatted as a string that represents Ektron CMS400’s display of the date. |
|
|
DisplayGoLiveDate |
The content block’s start date. It is formatted as a string that represents Ektron CMS400’s display of the date. |
|
|
DisplayStartDate |
The content block’s start date. It is formatted as a string that represents Ektron CMS400’s display of the date. |
|
|
EndDate |
The content block’s end date, formatted as a .NET date type. |
|
|
EndDateAction |
archive display archive expire refresh report |
|
|
FolderID |
The ID of the folder that contains each content block. |
|
|
GoLiveDate |
The content block’s start date formatted as a .NET date type. |
|
|
Html |
The content that makes up the content block. If content block is in XML it will return it as raw XML content. |
|
|
Hyperlink |
Content block title wrapped by <a href> tags. |
|
|
Id |
The content block ‘s ID number. |
|
|
InheritedFrom |
If folder permissions are inherited, the folder from which they are inherited. |
|
|
IsInherited |
Whether a content block’s permissions are inherited. |
|
|
IsPrivate |
Whether or not a content block is private. |
|
|
Language |
The content block’s language. |
|
|
LastEditorFname |
The first name of the last person to edit the content block. |
|
|
LastEditorLname |
The last name of the last person to edit the content block. |
|
|
PackageDisplayXSLT |
If the content block is XML, the name of its XSLT. |
|
|
QuickLink |
The content block’s quicklink. |
|
|
StartDate |
The content block’s start date formatted as a .NET date type. |
|
|
Status |
The status of the content block approved checked out checked in expired pending deletion pending expiration pending start date submitted |
|
|
Teaser |
The content block summary. |
|
|
TemplateLink |
Currently empty and not being used with the ContentBlock server control. |
|
|
Title |
The content block title. |
|
|
UserID |
Last user who edited the content. |
|
|
Xslt1 |
The content block’s first Xslt, as defined in Ektron CMS400.NET. |
|
|
Xslt2 |
The content block’s second Xslt, as defined in Ektron CMS400.NET. |
|
|
Xslt3 |
The content block’s third Xslt, as defined in Ektron CMS400.NET. |
|
|
Xslt4 |
The developer can use this property programmatically. Ektron CMS400.NET only uses Xslt1, 2 and 3 in the workarea. |
|
|
Xslt5 |
The developer can use this property programmatically. Ektron CMS400.NET only uses Xslt1, 2 and 3 in the workarea. |
|
Accessing Items in an Array
To access and manipulate content blocks returned by an object, use the common class Ektron.Cms.Common.ContentBase. EkItems is an array of Ektron.Cms.Common.ContentBase. EkItem is a single Ektron.Cms.Common.ContentBase.
Search, Collection and ListSummary have EkItems (an array of ContentBase), while ContentBlock has a single EkItem. Here is an example of how to use this feature.
dim MyC as new Ektron.Cms.Controls.Collection
MyC.DefaultCollectionID = 1
MyC.ID = “Collection1”
MyC.Page = Page
MyC.Fill()
dim item as Ektron.Cms.Common.ContentBase
MyC.Text = "<ul>"
for each item in MyC.EkItems
MyC.Text &= "<li>" & item.Title & "</lI>"
next
MyC.Text &= "</ul>"
Response.Write(MyC.Text())
This example formats every item in the collection in a bulleted list.
Note: For information on using ekitems with the eCommerce server controls, see Using the EkItems Property with eCommerce Server Controls and Using eCommerce Server Control Events.
Referencing the Page Property
Server controls require a reference to their parent page (for example, utilizing the DynamicParameter property on a content block to check for a query string), you must provide access to the page object if you declared your control in the code behind. To do this, set the control's Page property to the Web page you're working on. For an example, see the code in red and italics below.
dim search as new Ektron.Cms.Controls.Search()
MySearch.ID = “Search1”
MySearch.Page = Page
MySearch.Fill()
With C#, use this syntax.
Ektron.Cms.Controls.Search MySearch = new Ektron.Cms.Controls.Search();
MySearch.Page = Page;
MySearch.Fill();
This relationship is only required when inserting a control in the code behind. When dragging and dropping, even if you make changes in code behind, the relationship is automatically generated.
|
Best Practice Ektron recommends including the Page property reference when using the server controls as components in the code behind. |
Customizing Server Controls
One of Visual Studio’s strengths is its separation of coding and logic from presentation. Web page formatting is handled by a page’s HTML, while the logic is handled by the code behind, which is stored in the corresponding .vb file. For example, if the ASP.NET page is mypage.aspx, the code behind file is mypage.aspx.vb.
Note: If you do not see the code behind files, click Show All Files on the VS Solution Explorer toolbar (circled in the following figure).

Within the vb file, you can use Visual Basic to insert code to manipulate the events that occur on the page.
This subsection contains the following topics:
Recognizing the Server Control Within the HTML
Recognizing the Server Control Within the Code Behind
Customizing the Server Control in the Code Behind
Troubleshooting Error Creating Control Message
Recognizing the Server Control Within the HTML
Within a Web page’s HTML, a <cms> tag wraps the Visual Studio object, as shown below.
<cms:Search id="Search1" runat="server" ButtonText="Search" Display="Vertical"></cms:Search>
Above is an example of a Search Server Control. Below is an example of a ContentBlock Server Control.
<cms:ContentBlock id="ctrlMainContentBlock" runat="server" DefaultContentID="1" DynamicParameter="id” OverrideXslt="Default"></cms:ContentBlock>
Recognizing the Server Control Within the Code Behind
Within the Visual Studio code behind file, the Ektron server controls appear (along with the VS controls) in the Web Form Designer Generated Code section. When you click + to display this section, you see something like the following. The content block listed in HTML above is circled below to help you see their relationship.

The next section of the code behind page loads the page into the browser.
Private Sub Page_Load(ByVal sender As System.Object, ByVal e As System.EventArgs) Handles MyBase.Load
We want our events to occur while the page is loading, so we’ll add custom code following this line.
Customizing the Server Control in the Code Behind
To customize an Ektron server control in the code behind, insert code similar to the following after the Page_load command.
Dim MyObj As New Ektron.Cms.Controls.ContentBlock
This code declares a variable named MyObj and assigns to it the value of a content block. The content block is part of the Ektron.CMS.Controls content base, so it has access to the Ektron CMS400.NET database.
After defining MyObj as a content block, you can access its properties. For example, to assign a defaultID of 24, insert the following.
Dim MyObj As New Ektron.Cms.Controls.ContentBlock
MyObj.DefaultContentID = 24
Now, the content block can be specified dynamically in the URL of the hyperlink that calls it. If not, content block 24 displays.
This is just an example of programmatically applying property values to content blocks. For a complete list of properties available to Ektron CMS400.NET objects, see List of Server Controls.
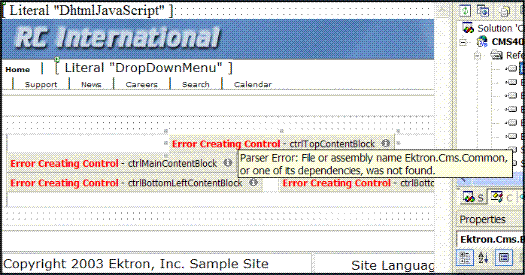
Troubleshooting Error Creating Control Message
If you get an Error Creating Control message while trying to use a server control, you can view the text of the error message by hovering the mouse over the control. See illustration below.
(continued in Using Drag & Drop and Programmatically Together)
